Dawg’s head gasket chronicles |
Post Reply 
|
Page <1234> |
| Author | |
Capt Fiero 
Admin Group 

Founding Member Joined: 12 February 2007 Location: Canada Status: Offline Points: 4039 |
 Post Options Post Options
 Quote Reply Quote Reply
 Posted: 12 October 2010 at 9:36am Posted: 12 October 2010 at 9:36am |
|
Looking good Dawg. I'll let you in on a little secret about the CSV later.
|
|
|
Capt Fiero
88 Fiero GT 5spd V6 Eight Fifty Seven GT V8 5spd. |
|
 |
|
|
Dawg
Senior Member 

Joined: 15 August 2009 Location: Canada Status: Offline Points: 988 |
Post Options
Quote Reply
Posted: 12 October 2010 at 6:53pm |
|
Didn't get the valve covers on today as hoped. But decided to make the upper plenum pretty instead.
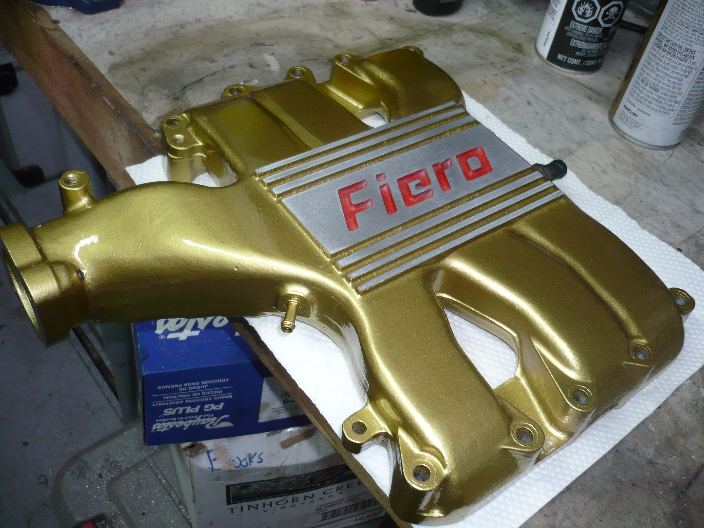 Man, there's a lot of nooks and crannies on this darn part. All the cleaning and prep work and multiple coats of paint. It took way too long......Oh well, it turned out great! I did the big bore treatment too so I guess that's not too bad then. It's going to look pretty fancy once it's all assembled. The Dawg |
|
|
You dream it up....I'll make it
|
|
|
|
|
Dawg
Senior Member
Joined: 15 August 2009 Location: Canada Status: Offline Points: 988 |
Post Options
Quote Reply
Posted: 12 October 2010 at 6:58pm |
|
Thanks buddy. I finally get to have one of my own modified intake systems. Yahoo!
CSV? Cold Start Valve? The Dawg
|
|
|
You dream it up....I'll make it
|
|
|
|
|
Dawg
Senior Member
Joined: 15 August 2009 Location: Canada Status: Offline Points: 988 |
Post Options
Quote Reply
Posted: 14 October 2010 at 4:55pm |
|
More progress.
Adjusted the rockers (Couldn't find the info you suggested John). Installed valve covers and lower plenum. 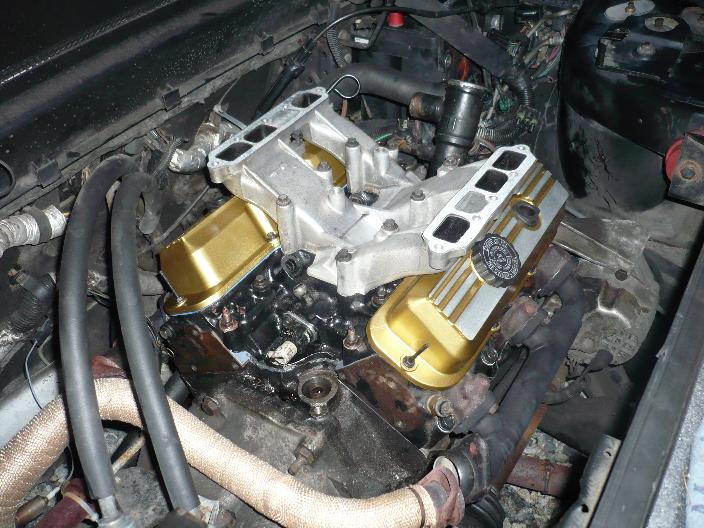 It's starting to look like something again. The Dawg |
|
|
You dream it up....I'll make it
|
|
|
|
|
Dr.Fiero
Senior Post God
Joined: 12 February 2007 Location: Canada Status: Offline Points: 1726 |
Post Options
Quote Reply
Posted: 14 October 2010 at 5:06pm |
From the site: Setting Hydraulic Lifter Pre-load (Adjustable Valve Train) With an adjustable valve train, proceed as follows: Install the pushrods and rocker arms. Be sure the pushrods are seated correctly in the lifter and rocker arm. Turn the engine over in the direction of rotation until the EXHAUST pushrod just begins to move upward, opening the valve. Now adjust the INTAKE rocker of that cylinder. Carefully tighten the nut on the intake rocker while spinning the pushrod with your fingertips. You will feel a slight resistance in the pushrod when you have taken up all of the clearance. This is �zero lash.� Turn the adjusting nut to the specified pre-load � typically 1/4-3/4 of a turn, but this will vary based on the lifter number. Turn the engine in its rotation direction until the intake pushrod comes all the way up and almost all the way back down. Now set the EXHAUST rocker to �zero lash� and add the specified pre-load. Repeat this process for all remaining cylinders. (guess it's too late now though) |
|
|
|
|
Dawg
Senior Member
Joined: 15 August 2009 Location: Canada Status: Offline Points: 988 |
Post Options
Quote Reply
Posted: 14 October 2010 at 7:55pm |
|
Yup.....ended up just doing the book method.
But the info is here now. The Dawg
|
|
|
You dream it up....I'll make it
|
|
|
|
|
kharmata
Senior Member
Joined: 19 April 2010 Location: Canada Status: Offline Points: 291 |
Post Options
Quote Reply
Posted: 15 October 2010 at 2:16pm |
|
Could you guess I really like the Silver on Gold look. No
duh!  Looking good. Looking good.
|
|
|
|
|
Dawg
Senior Member
Joined: 15 August 2009 Location: Canada Status: Offline Points: 988 |
Post Options
Quote Reply
Posted: 15 October 2010 at 4:28pm |
|
Thanks. It did turn out great.
Almost done now! Just a few bits here and there and it's time to start it up. If I had had the chance to work on it all day it would be running. But we need to go to a birthday party so tomorrow will have to do. 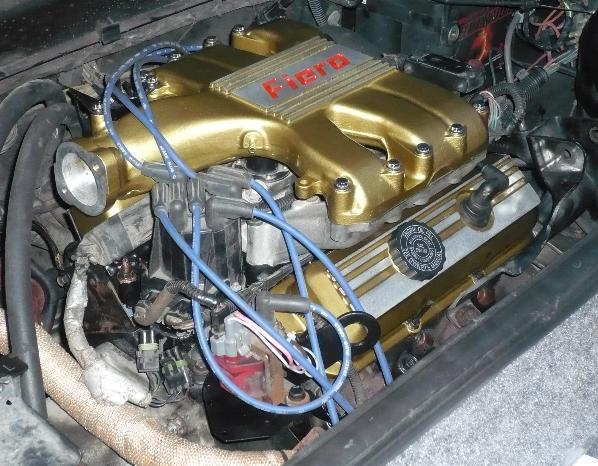 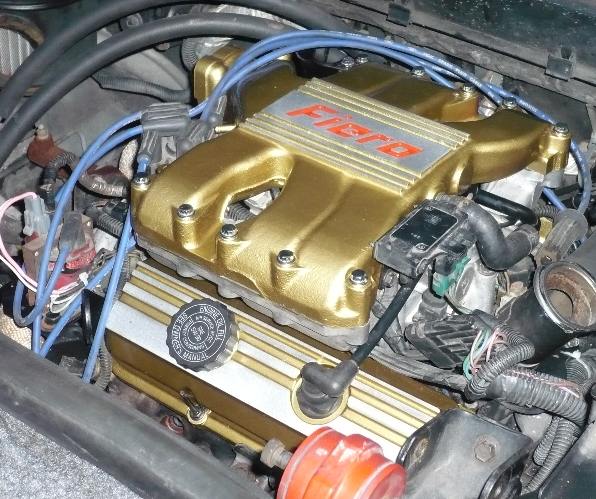 The biggest thing left to do is finish the big bore throttle body. Lots of hand fitting the butterfly valve left to do. The Dawg |
|
|
You dream it up....I'll make it
|
|
|
|
|
Patrick
Newbie 
Joined: 19 April 2008 Location: Vancouver Status: Offline Points: 5 |
Post Options
Quote Reply
Posted: 15 October 2010 at 5:01pm |
|
So, do we all get trips around the block to feel the difference? Good job!
|
|
|
|
|
kharmata
Senior Member
Joined: 19 April 2010 Location: Canada Status: Offline Points: 291 |
Post Options
Quote Reply
Posted: 15 October 2010 at 6:15pm |
|
Now the big red dog bone will stand out like a sore thumb.
 Sheesh sounds like something Tristan would say. Sheesh sounds like something Tristan would say.
|
|
|
|
|
Patrick
Newbie
Joined: 19 April 2008 Location: Vancouver Status: Offline Points: 5 |
Post Options
Quote Reply
Posted: 15 October 2010 at 7:05pm |
|
Fixed that for you.
|
|
|
|
|
Dr.Fiero
Senior Post God
Joined: 12 February 2007 Location: Canada Status: Offline Points: 1726 |
Post Options
Quote Reply
Posted: 15 October 2010 at 7:07pm |
|
Just my opinion (for whatever that's worth!) - fill in the "FIERO" with gloss black enamel.
|
|
|
|
|
Patrick
Newbie
Joined: 19 April 2008 Location: Vancouver Status: Offline Points: 5 |
Post Options
Quote Reply
Posted: 15 October 2010 at 7:15pm |
|
Fixed that some more for you. Sorry Damien, we're a bad bunch.
|
|
|
|
|
Capt Fiero
Admin Group
Founding Member Joined: 12 February 2007 Location: Canada Status: Offline Points: 4039 |
Post Options
Quote Reply
Posted: 15 October 2010 at 7:23pm |
|
Na keep the red and add some nice red wires. IMHO its the blue wires that are the odd duck in the stack.
|
|
|
Capt Fiero
88 Fiero GT 5spd V6 Eight Fifty Seven GT V8 5spd. |
|
|
|
|
kharmata
Senior Member
Joined: 19 April 2010 Location: Canada Status: Offline Points: 291 |
Post Options
Quote Reply
Posted: 15 October 2010 at 8:59pm |
|
 And as Patrick says we sure are bad. Do whatever the hell you want obviously! 
|
|
|
|
|
Dawg
Senior Member
Joined: 15 August 2009 Location: Canada Status: Offline Points: 988 |
Post Options
Quote Reply
Posted: 15 October 2010 at 10:05pm |
|
Hahahaha....you guys!
As a matter of fact, Michelle was wanting the Fiero black also but I said I would try it red. Red being my favorite color of course. The thick layer of clear coat just makes everything gleam. It's way better in person. Hopefully I'll make it to a meeting some time this century to show it off. The Dawg |
|
|
You dream it up....I'll make it
|
|
|
|
|
Dawg
Senior Member
Joined: 15 August 2009 Location: Canada Status: Offline Points: 988 |
Post Options
Quote Reply
Posted: 15 October 2010 at 10:17pm |
|
As long as we get to swap cars....:)
Fear not, I will be reporting my findings in detail. I'm expecting the performance cam will really bring out the best of this big bore mod. The timing wasn't right for the variable fuel regulator which is too bad. Maybe this spring. Thanks, it turned out better than I imagined it would.
|
|
|
You dream it up....I'll make it
|
|
|
|
|
Romeo
Senior Post God

Joined: 16 November 2008 Location: Canada Status: Offline Points: 3033 |
Post Options
Quote Reply
Posted: 16 October 2010 at 1:16am |
|

AND JUST WHAT IS THAT SUPPOSED TO MEAN, MR KEVIN-GUY? lol |
|
|
Never shift into reverse without a back-up plan.
|
|
|
|
|
Dawg
Senior Member
Joined: 15 August 2009 Location: Canada Status: Offline Points: 988 |
Post Options
Quote Reply
Posted: 16 October 2010 at 8:07pm |
|
Good news my homies! She started up just fine with no issues. I don't have a timing light so I set things up by ear for now. It certainly sounds different that's for sure. I punched the throttle and with no air cleaner it whoops good.
Here's totally finished just about to start.  I made a short video but it's way too big to upload. I'll try and figure something out. Happy Days! The Dawg 2010-10-16_225013_first_start-small.mov |
|
|
You dream it up....I'll make it
|
|
|
|
|
Dawg
Senior Member
Joined: 15 August 2009 Location: Canada Status: Offline Points: 988 |
Post Options
Quote Reply
Posted: 17 October 2010 at 5:28pm |
|
Ok....the car has been taken on it's maiden voyage and WOW, what a difference. I am amazed how this has changed the throttle response.
More bottom end for sure and that sound....yummy. Sounds more throaty, like it's gonna bite someone. Top end? That will have to wait till I get everything tuned up. It always seemed like it wanted to go faster before, now even more so. On another note, I'm still having some cooling issues. I've spent the better part of 2 hours "burping" this thing. I go for a run and come home and open the engines rad cap. The first few times it spewed a fair bit before calming down. The last time I did it, it just barely burped and nothing else. I've got it to the point now where it keeps the car nice and cool for about 10 minutes or so and then the gauge rises into the red quickly then after 10-20 seconds drops right back down. I've checked for bubbles in the water, there are non to speak of. The odd gurgle if I shake the car back and forth. I've purchased a new water pump just in case. If I can get this sorted out I'll bring it back. So I know Dave has said he's seen this sort of thing before and that it's vapor lock of some sort. Anyone have any ideas on how to get it all out? I'm thinking of parking the car with the front up hill and burping the radiator a few times. Any suggestions would be great. Thanks, The Dawg |
|
|
You dream it up....I'll make it
|
|
|
|
|
Post Reply
|
Page <1234> |
 Tweet
Tweet
|
| Forum Jump | Forum Permissions You cannot post new topics in this forum You cannot reply to topics in this forum You cannot delete your posts in this forum You cannot edit your posts in this forum You cannot create polls in this forum You cannot vote in polls in this forum |


 Topic Options
 Capt Fiero wrote:
