3.5L LX9 Swap into ’86 2M6 4 speed |
Post Reply 
|
Page <1234 5> |
| Author | |||
bcampbell 
Senior Member 
Joined: 14 November 2011 Location: Canada Status: Offline Points: 160 |
 Post Options Post Options
 Quote Reply Quote Reply
 Posted: 14 February 2012 at 11:15am Posted: 14 February 2012 at 11:15am |
||
On the website I selected the cheapest option (USPS). UPS (1 x 0.6lbs) is listed as $76.15.
When I tuned my LT1 swap, I just disabled PE mode to tune these areas and it was successful. However the tune was already much closer to being correct to begin with anyway. I know a wideband is definitely the way to go. It might be possible to borrow one from a friend who's car is parked right now anyways but I don't think his has an output for datalogging (just a gauge).
I'll look into it. I do happen to have a TGP turbo set- up that I'm trying to sell right now but if I am unable to sell it I may decide to use it on this engine in the future. |
|||
 |
|||
|
bcampbell
Senior Member
Joined: 14 November 2011 Location: Canada Status: Offline Points: 160 |
Post Options
Quote Reply
Posted: 14 February 2012 at 11:19am |
||
Doesn't the $A1 OBD1 code have a lean burn/highway mode already? |
|||
|
|||
|
CFoss
Senior Member

Joined: 13 February 2007 Location: Canada Status: Offline Points: 580 |
Post Options
Quote Reply
Posted: 14 February 2012 at 11:26am |
||
|
To be honest, I'm not familiar with that code.
Does it have wideband code in it? C |
|||
|
86 SE 3.4
|
|||
|
|||
|
bcampbell
Senior Member
Joined: 14 November 2011 Location: Canada Status: Offline Points: 160 |
Post Options
Quote Reply
Posted: 14 February 2012 at 11:39am |
||
|
Not that I'm aware of, but there's at least one hacked
version of it and it looks like it has wideband ability, in addition to having MAP tables with smaller (and I'm assuming more accurate) increments, and the ability to tune for much higher revving. It's called nAst1. |
|||
|
|||
|
bcampbell
Senior Member
Joined: 14 November 2011 Location: Canada Status: Offline Points: 160 |
Post Options
Quote Reply
Posted: 14 February 2012 at 2:37pm |
||
|
Just finished the first step of the wiring harness;
repinning the ECM connectors. On the second page of instructions, the first direction is to connect a wire to the A/C pressure sensor (5V reference). I'm assuming since I don't have A/C I won't need this wire. However in the 7730 pinout this wire is a 5V reference for the TPS sensor. I just want to check and make sure that the 5V reference for the TPS sensor will be provided with another already existing wire. |
|||
|
|||
|
CFoss
Senior Member
Joined: 13 February 2007 Location: Canada Status: Offline Points: 580 |
Post Options
Quote Reply
Posted: 14 February 2012 at 3:48pm |
||
|
These kind of questions...try to get a hold of a schematic for a car that used the '7730 instead of just a repin table. Then you will understand what you are doing.
Like this one: 1991 corsica 3.1: 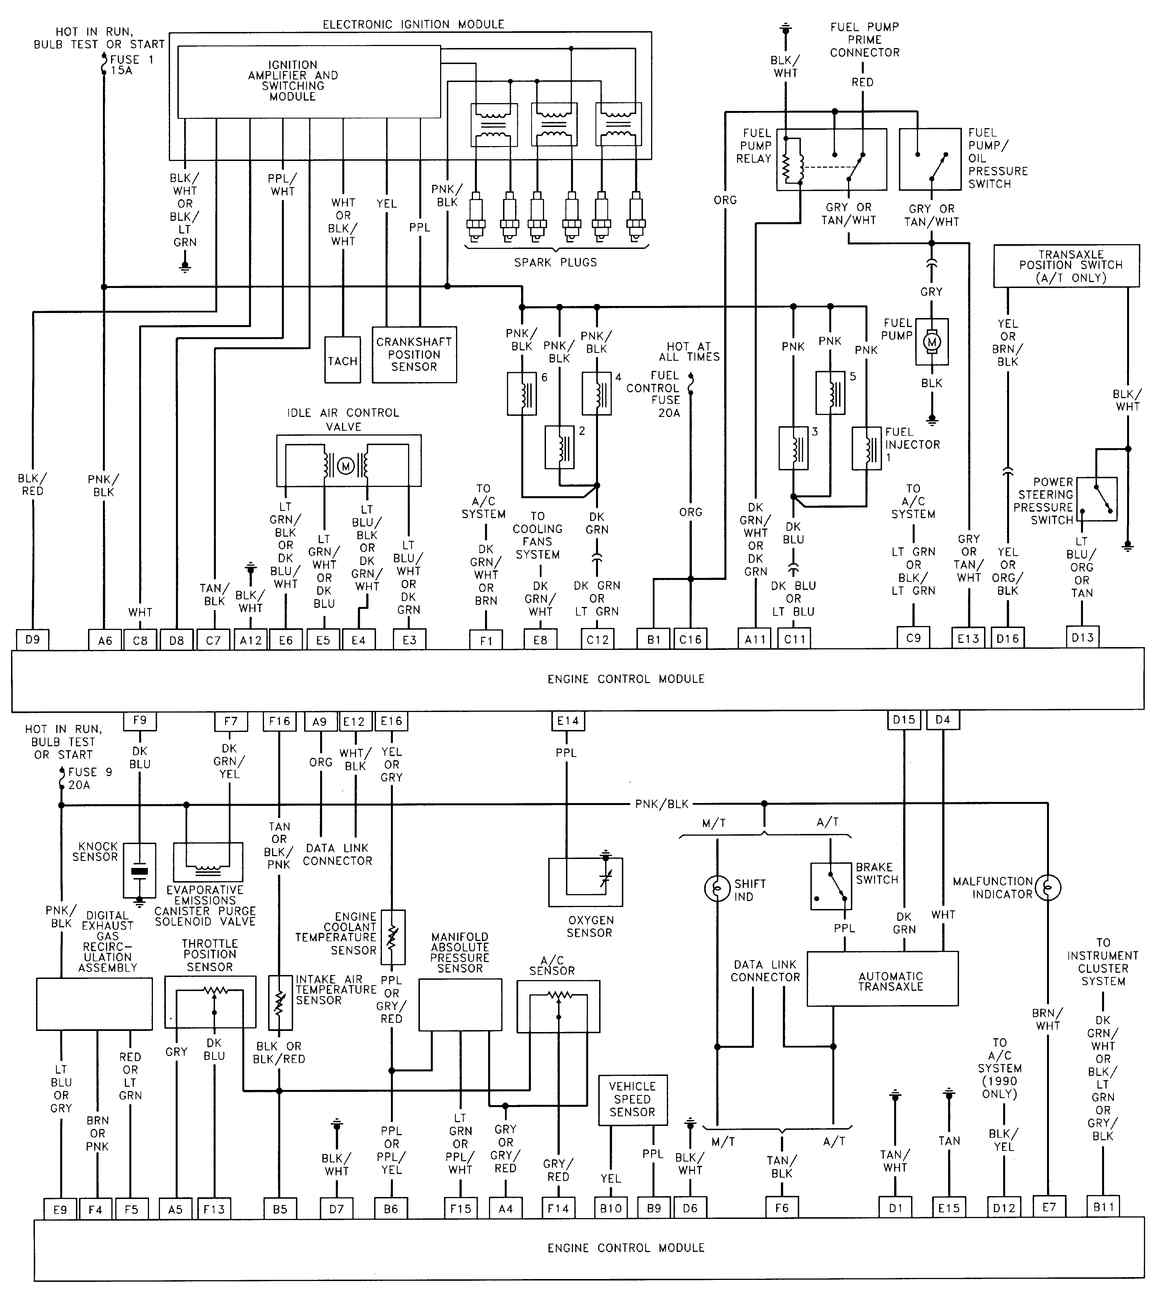 It seems like what you are talking about is pin A4 (Also known as BA4) which feeds power to the map, and ac pressure sensor. If so, just omit the connection to the ac sensor and you will be fine. Likewise on the ground (B5, or BB5) which is the ground for the tps, iat and ac sensor. Chay |
|||
|
86 SE 3.4
|
|||
|
|||
|
CFoss
Senior Member
Joined: 13 February 2007 Location: Canada Status: Offline Points: 580 |
Post Options
Quote Reply
Posted: 14 February 2012 at 3:57pm |
||
|
Having reread your question, it looks like the on the '7730, BA4 and BA5 are both +5 ref.
The table you are working from shows you are supposed to change C14 from the old ecm to BA4 of the new ecm. C14 is the +5V connection to the tps and map, which you are then hooking to the BA4 +5 on the '7730. BA5 is therefore unused in the '7730. Chay |
|||
|
86 SE 3.4
|
|||
|
|||
|
bcampbell
Senior Member
Joined: 14 November 2011 Location: Canada Status: Offline Points: 160 |
Post Options
Quote Reply
Posted: 14 February 2012 at 4:18pm |
||
|
Ok that's what I thought thanks
|
|||
|
|||
|
bcampbell
Senior Member
Joined: 14 November 2011 Location: Canada Status: Offline Points: 160 |
Post Options
Quote Reply
Posted: 15 February 2012 at 2:01pm |
||
|
Ok I ordered the G1 package from Moates today, they told
me they could ship it regular USPS for $12.95; they are going to refund the money from the $33 shipping charge. I started wiring in the LX9 fuel injector/MAP/CTS harness today and just had a few things I would like to clarify. The Fiero harness has two IGN power sources for the injectors, one for each bank, while the new harness only has one source. I figure if I just use one of the Fiero wires (INJ 1), I can just double the fuse to a 10A and delete the other INJ 2 power wire. Also, I can just take the ECM signal wires for 1, 3, and 5 and 2, 4, and 6 on the new harness and splice them into their corresponding single wires on the Fiero injector harness. The remaining CSI wires on the Fiero harness are deleted. MAP sensor wiring is pretty straightforward, 5V reference, signal, and low reference (ground). CTS I'm thinking I'll run a 3-wire sensor, have two wires running through the existing LX9 harness, and have the third wire going to the gauge seperately. |
|||
|
|||
|
CFoss
Senior Member
Joined: 13 February 2007 Location: Canada Status: Offline Points: 580 |
Post Options
Quote Reply
Posted: 15 February 2012 at 3:24pm |
||
|
Re: Shipping costs...that's a bit more like it!
Re: 10 A fuse: Just make sure that the wire guage is up to it. 10A should be a #16 at the minimum, #14 prefered. If you splice as you've explained above, split 3 injector wires to the +12 harness, and 3 to the ecm switched ground wire that'd be optimal. Then you should have lots of current capability. What's a CSI?? The guage and ecm coolant temp sensors are separate on the fiero. Don't mix the 2 circuits would be my advice. The ecm is just a variable resistor which is between an ecm pin and ground. The ecm measures the current flow and determines a temp. The guage circuit should be untouched?? It looks like this: 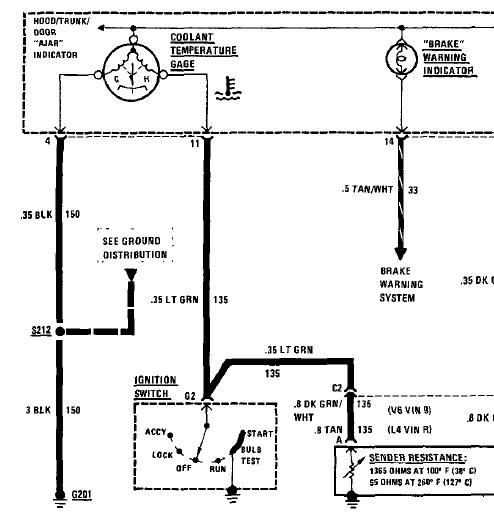 The ecm one looks like this:  Chay |
|||
|
86 SE 3.4
|
|||
|
|||
|
bcampbell
Senior Member
Joined: 14 November 2011 Location: Canada Status: Offline Points: 160 |
Post Options
Quote Reply
Posted: 15 February 2012 at 3:52pm |
||
|
CSI=cold start injector no longer used with a 7730.
The power wire for the new injectors in the lx9 harness is of a smaller gauge than just one (either inj1 or inj2) injector wire from the fiero harness. I see no reason the wiring should be overloaded. IIRC the fiero wire was 14 gauge. As for the CTS, if I used the 2.8 gauge sender on the new engine that means drilling and tapping another hole for the sender. Some newer 60*V6s use a 3 wire sensor where 2 wires are exactly like a 2 wire ECT sensor and the third wire drives the gauge, so it's basically just two in one. This route means I would take the third wire on the new sensor and splice it into the 2.8 sender wire. |
|||
|
|||
|
CFoss
Senior Member
Joined: 13 February 2007 Location: Canada Status: Offline Points: 580 |
Post Options
Quote Reply
Posted: 15 February 2012 at 6:02pm |
||
|
Ah yes, the good old csi.
14 guage should be fine. Cool on the CTS. I've not seen a 3 wire, but it sounds like you have it fingered out! C |
|||
|
86 SE 3.4
|
|||
|
|||
|
bcampbell
Senior Member
Joined: 14 November 2011 Location: Canada Status: Offline Points: 160 |
Post Options
Quote Reply
Posted: 15 February 2012 at 6:41pm |
||
|
I did want to ask about the gauge sender though. Obviously one wire
on it is the gauge signal, but what's the other wire for? Is it for the warning light in the gauge cluster? Or is it just a ground? |
|||
|
|||
|
bcampbell
Senior Member
Joined: 14 November 2011 Location: Canada Status: Offline Points: 160 |
Post Options
Quote Reply
Posted: 15 February 2012 at 7:50pm |
||
|
Oh and I also meant to ask: would the now unused INJ 2 wire be a
good power supply for a heated o2 sensor? |
|||
|
|||
|
bcampbell
Senior Member
Joined: 14 November 2011 Location: Canada Status: Offline Points: 160 |
Post Options
Quote Reply
Posted: 15 February 2012 at 10:35pm |
||
To answer my own question it appears that one wire is the gauge signal and one is the warning light switch. I should just be able to leave the warning light switch wire unwired. |
|||
|
|||
|
bcampbell
Senior Member
Joined: 14 November 2011 Location: Canada Status: Offline Points: 160 |
Post Options
Quote Reply
Posted: 16 February 2012 at 12:33am |
||
|
Just did some reading up on codemask $59 and it looks like
most people running it have boosted engines. For the foreseeable future I plan on keeping this engine N/A so I'll probably just stick with $A1. If I wanted more power I would probably be more inclined to do a cam swap to maintain some form of fuel economy. |
|||
|
|||
|
CFoss
Senior Member
Joined: 13 February 2007 Location: Canada Status: Offline Points: 580 |
Post Options
Quote Reply
Posted: 16 February 2012 at 4:47pm |
||
|
$59 just give you the option is all.
I was running it n/a and it worked well. Nothing wrong with the $A1 though. The o2 sensor...not sure. It's just amps and awg though, nothing special. I don't know how much o2 sensors draw. Chay |
|||
|
86 SE 3.4
|
|||
|
|||
|
bcampbell
Senior Member
Joined: 14 November 2011 Location: Canada Status: Offline Points: 160 |
Post Options
Quote Reply
Posted: 18 February 2012 at 12:04am |
||
|
Nice thing about the heated o2 sensors is that my engine
came with 3 of them. So if one doesn't work I should still have one that does. I'm probably going to make a trip to Port Angeles on Monday or Tuesday to grab at the very least a flywheel and a knock sensor. Those items are each $100 here and about $100 combined there so I'll be saving plenty. I'll also try to grab a 3 wire CTS, radiator hoses (using 3400 swap part numbers mentioned on 60degreev6.com) and a 2001 vette fuel filter. Maybe some fuel injection hose as well. Wiring is mostly finished now, I've changed the pigtails for the TPS and IAC, wired in the knock sensor using the fan switch pigtail, and connected the wires for the computer fan control. I still have to do the DIS wiring and crank sensor. Question about the crank sensor: does the twisted pair of wires have to be twisted the whole length of the wires? Cuz where the pigtails connect I'm not sure it's gonna want to twist perfectly... I've started routing the wires around the engine but want to get it back in the car to get everything perfect. I'll loom it up after I get the engine started. I'm thinking to mount the coils I'll use the 3500 mounting bracket and drill holes for the 3400 coils and ICM. 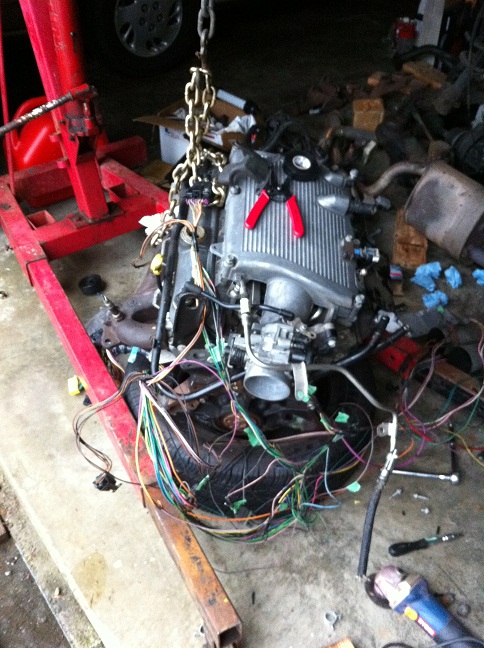
|
|||
|
|||
|
CFoss
Senior Member
Joined: 13 February 2007 Location: Canada Status: Offline Points: 580 |
Post Options
Quote Reply
Posted: 18 February 2012 at 6:11pm |
||
|
It's unlikely a bit of untwisting will hurt.
The idea of a twisted pair is that it radiates less noise, and also rejects incoming noise better than parallel run wires. Try to maintain the same number of twist per foot as the original. A bit or error here or there should be fine. Chay |
|||
|
86 SE 3.4
|
|||
|
|||
|
bcampbell
Senior Member
Joined: 14 November 2011 Location: Canada Status: Offline Points: 160 |
Post Options
Quote Reply
Posted: 22 February 2012 at 9:36pm |
||
|
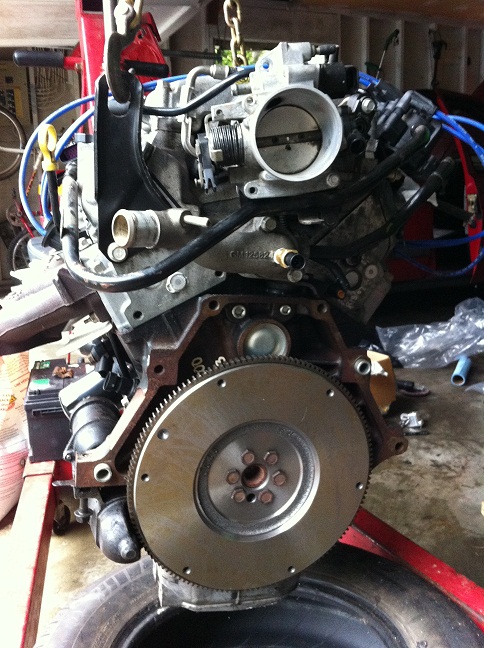
Ok so I went to Port Angeles and stayed overnight with
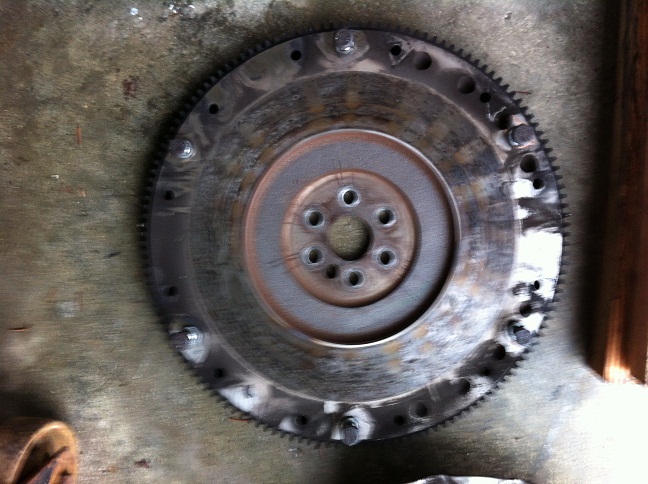
friends there. I spent almost $200 on parts and didn't get charged any duty so that was nice. I ended up getting a vette fuel filter, flywheel, oil cap, idler pulley (one of mine was broken), oil filter (wix), crank sensor, 3-wire CTS (for 97 Grand Prix, in case anyone is wondering), and a new front engine mount. When I called on Saturday they said they would hold a knock sensor for me but it wasn't there when I arrived. Oh well, I'll probably find a couple in a JY and hope one of them works. Today I installed my flywheel and clutch, I also bolted up the 2.8 starter; it comes very close to touching the oil pan but I don't see it being a problem, I just need to get a shorter bolt because one of the 2.8's bolts is too long for the new engine. I cleaned up the inside of the 4 speed's bellhousing and installed the new engine mount on the cradle. I'm about ready to mount the engine to the cradle. I couldn't find a part number for a pilot bearing and didn't see a bearing in the 2.8 so I'm assuming that the 4 speed manual doesn't use one. I also found out that a Canadian Tire pickle fork makes a perfect clutch alignment tool: 
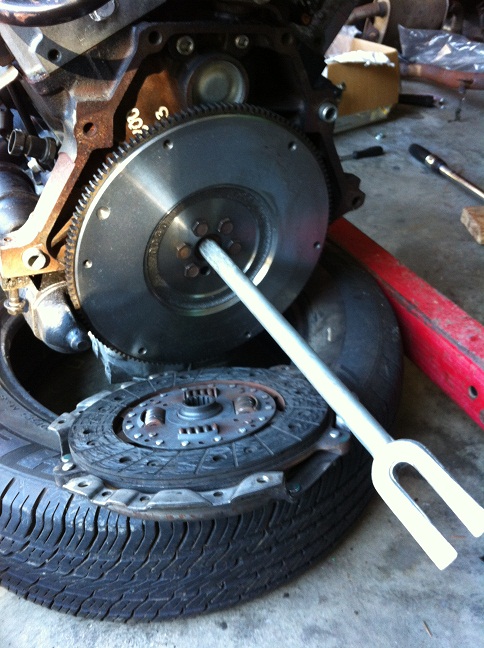
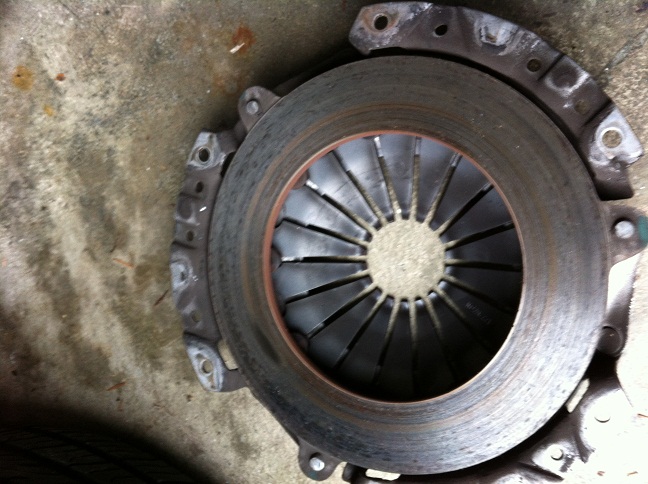
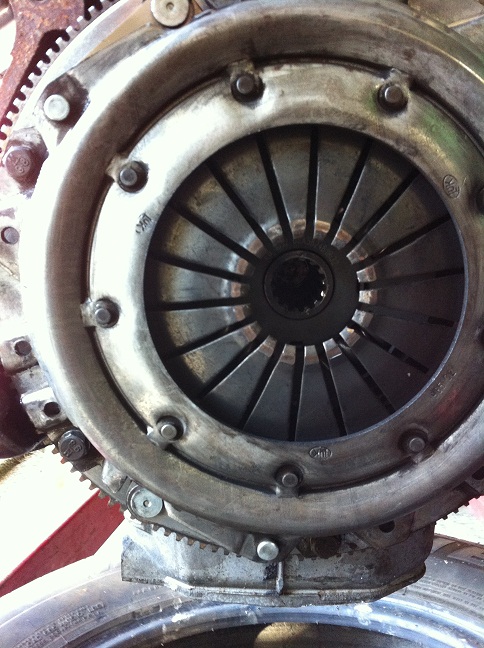
Some pics of the old flywheel vs new and the friction surfaces: 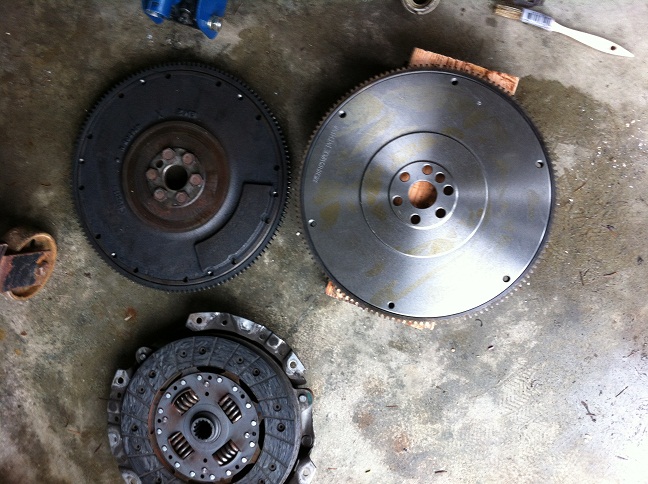
Thickness of the clutch: 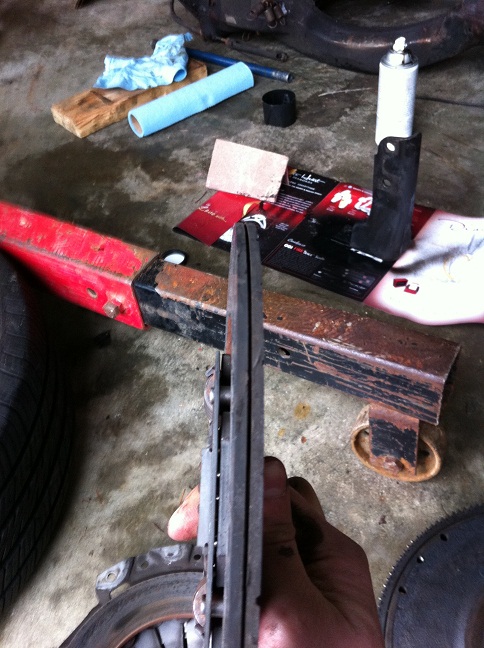
I found out the 2.8 spark plug wires work fine where I mounted the coils. They're a little on the short side for one side but they're not being stretched so I think they'll be fine (NGK). To mount the coils I drilled holes in the 3.5 mounting bracket and used nuts to secure the bolts. The original mounting bolts are still in-tact in case I want to go back to the 3.5 coils in the future. I did want to ask if anyone knows what this port in the rear side valve cover is for: 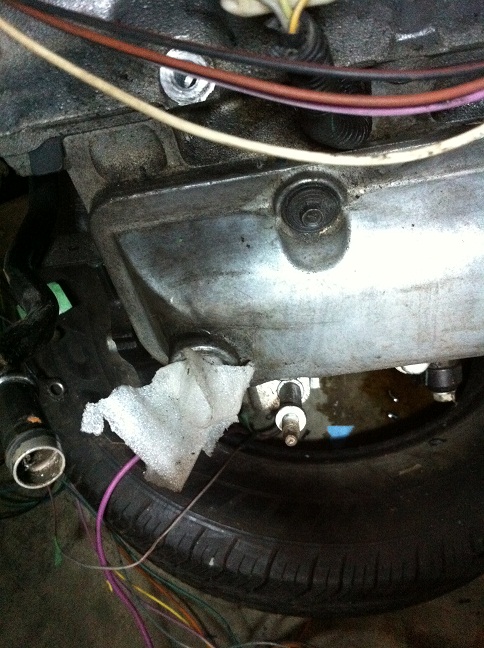
I'm assuming it's for PCV, but the other side valve cover already goes to just behind the throttle body so I'm wondering if anyone knows where the other port goes. Could I just put a breather on it or does it require vacuum? Edit: Found out it just needs filtered air. I'll probably put a breather on it. |
|||
|
|||
|
Post Reply
|
Page <1234 5> |
 Tweet
Tweet
|
| Forum Jump | Forum Permissions You cannot post new topics in this forum You cannot reply to topics in this forum You cannot delete your posts in this forum You cannot edit your posts in this forum You cannot create polls in this forum You cannot vote in polls in this forum |


 Topic Options
 CFoss wrote: