My 3800 SC1 swap
Printed From: West Coast Fieros
Category: Technical Topics Forum
Forum Name: Build Threads
Forum Description: A Place to post step by step build threads.
URL: http://www.westcoastfieros.com/forum/forum_posts.asp?TID=1211
Printed Date: 01 August 2025 at 12:49pm
Software Version: Web Wiz Forums 12.01 - http://www.webwizforums.com
Topic: My 3800 SC1 swap
Posted By: D_sensitized
Subject: My 3800 SC1 swap
Date Posted: 07 March 2009 at 4:47pm
|
I'm finally going to get some real work done on this swap so I'm starting this thread to show my progress and get some help when needed. The car: 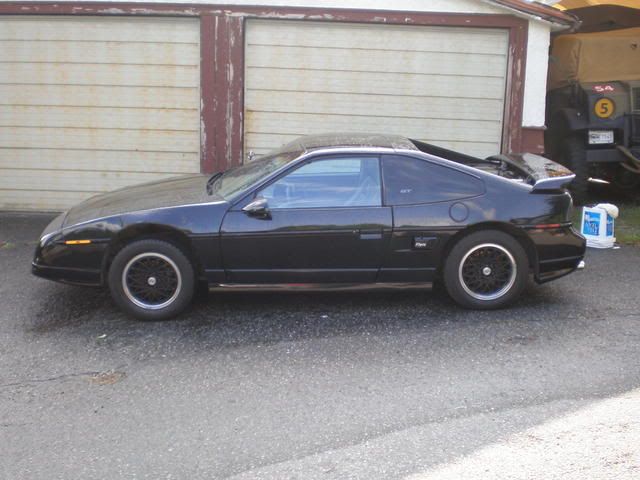 1988 GT The engine: 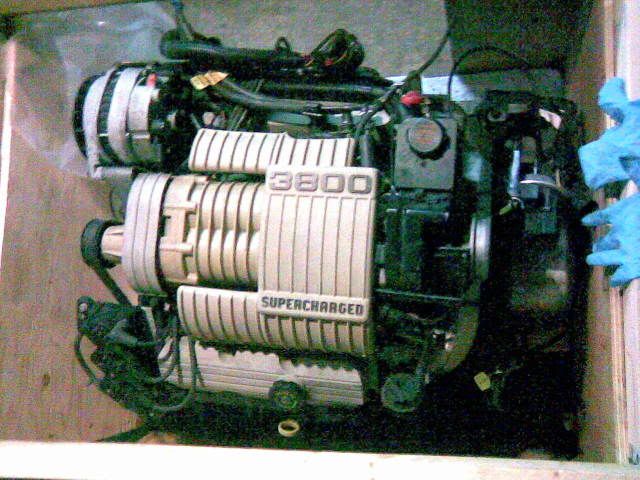 From a 1995 oldsmobile 88. I took apart the engine to make sure it was good inside and for the learning experience and right now the heads havn't been put back on yet. So that's where that is at. For the mounts, I know the transmission is the same that was used with the series 2 engines so those will be easy to find but what about the engine mounts? Will mounts for a series 2 engine fit this one? or will I have to get them made up myself? Any tips to make this easier will be appreciated. |
Replies:
Posted By: Blair
Date Posted: 17 March 2009 at 5:31am
|
It's my understanding that the engine mounting hole position is the same in the series 2 engine as the series 1 engine. A wcf mount should work but e-mail them and ask. |
Posted By: D_sensitized
Date Posted: 17 March 2009 at 4:56pm
| Thanks, that's what I was hoping for. I'll send an email over to wcf and let you know. |
Posted By: D_sensitized
Date Posted: 19 March 2009 at 6:41pm
| Got a reply and Chris at WCF said they'll work fine. I'll order them pretty soon. |
Posted By: D_sensitized
Date Posted: 05 April 2009 at 8:59pm
Well I'm still slowly working on getting the motor back together, I decided to do a port and polish job on it so picked up a dye grinder and some sanding drums this weekend. But forgot to get the mandrel to put the 2 together  |
Posted By: D_sensitized
Date Posted: 15 July 2009 at 11:29pm
|
Progress! I finally finished doing the heads and got them back from the machine shop this week. So now the heads are back on but we only just now realized that lordco gave us the gasket set for the series 2 motor. We had bought most of another set of ebay for a few bucks though so we have most of what we need but not enough for the intake manifold yet though. so here it is as it sits tonight.   |
Posted By: 84 Indy
Date Posted: 09 October 2009 at 11:06pm
| updates? |
Posted By: D_sensitized
Date Posted: 11 October 2009 at 12:01pm
|
There has been a little progress, i got the engine back together minus electronics, alternator, throttle body and fuel systems. I have to wait to get the cradle out of the car before I can start trying to mount the alt. I plan on putting it in place of the A/C compressor with a custom built bracket on the same belt as the S/C and waterpump so I only need the one belt. I had to spend most of my time this summer replacing the head gaskets on my eldorado and installing a head stud kit. http://i96.photobucket.com/albums/l169/D_sensitized/CIMG1175.jpg?t=1255287670 - (pic) Unfortunately this project is on hold for the next year or so as I'm leaving for New Zealand/Australia this friday and won't be back till around spring 2011. I'll go snap some photos of the engine as it sits now this afternoon. |
Posted By: D_sensitized
Date Posted: 11 October 2009 at 3:07pm
pics as promised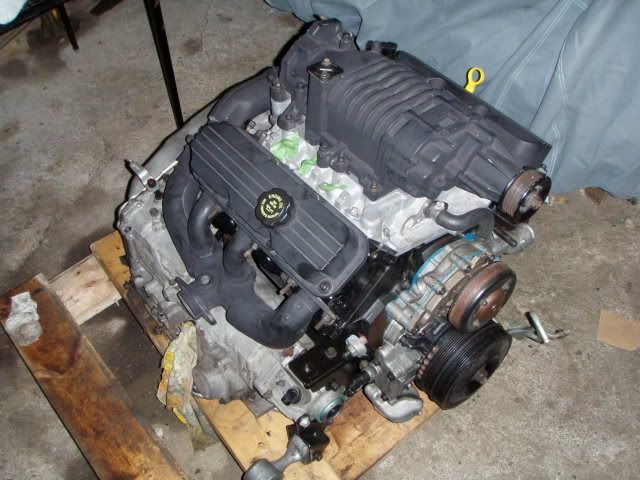 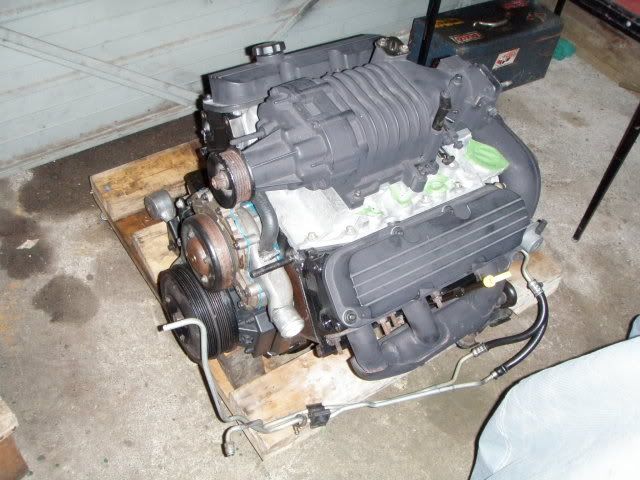 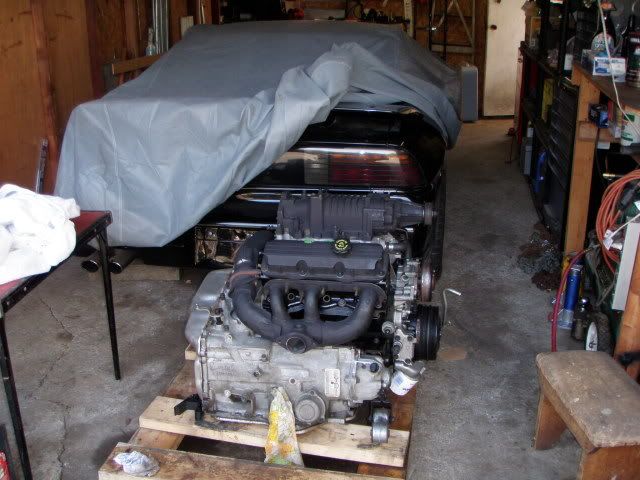 |
Posted By: kawana
Date Posted: 11 October 2009 at 7:12pm
| how much power does the series I put out? |
Posted By: 84 Indy
Date Posted: 11 October 2009 at 8:44pm
| oh come on your so close now!! |
Posted By: D_sensitized
Date Posted: 13 October 2009 at 10:50am
|
Stock is about 225hp/260lb-ft. Not sure how much the porting will do but the lack of power steering and A/C should free up some power. I will probably get some new rockers and port the blower somewhere along the way along with a cold air intake. |
Posted By: Romeo
Date Posted: 13 October 2009 at 7:03pm
|
Are you going to put an undersize pulley on later too? ------------- Never shift into reverse without a back-up plan. |
Posted By: D_sensitized
Date Posted: 13 October 2009 at 10:09pm
|
I was thinking a turbo, much later. Undersize pulleys don't do much for the earlier gen SCs like the do for the newer ones. The stock pulley is already smaller then on the series 2 and 3 motors because the supercharger isn't nearly as efficient. |
Posted By: Romeo
Date Posted: 14 October 2009 at 6:24pm
|
Don't you dare go to Turbo. That's like slapping god in the face for giving you a winning lottery ticket. Think of the throttle response and low end power you stand to lose! ------------- Never shift into reverse without a back-up plan. |
Posted By: D_sensitized
Date Posted: 22 November 2009 at 2:50pm
|
I might, and might not. I could always try to make a new intake manifold to fit a newer S/C. We changed out plans for our trip, we spend the last few weeks touring all over NZ and decided working etc would be easier back home so we're coming back to Canada pretty soon. So hopefully I will be able to get a lot more work done over the winter. Progress will resume soon |
Posted By: D_sensitized
Date Posted: 06 December 2009 at 2:25pm
|
Well we pretty much have the car ready to take the engine out, hopefully we will have time to do it this week but that might not happen till the weekend or next week. question: I have a cradle, trans, axles, suspension from an 85, would I be able to bolt that into the 88 just so i can still roll the car around while i work on getting the engine mounted to the 88 cradle? |
Posted By: Dr.Fiero
Date Posted: 06 December 2009 at 5:05pm
|
The cradle will fit (probably - there's been slight changes I've seen - like on the order of 1/4") from year to year. Problem is the struts won't line up. But since you're only going to roll it around, you might be able to just rig up some blocks of wood in place of the struts! Bolt them where they're supposed to go in the knuckles - then screw a little bit of plywood to the top of the post where it would go in the tower. |
Posted By: Patrick
Date Posted: 07 December 2009 at 11:44am
|
Harrison (D_sensitized), nice to meet you at the wrecking yard. Thanks for the use of the tiny Allen wrench!
|
Posted By: D_sensitized
Date Posted: 08 December 2009 at 7:07pm
|
Thanks, I'll see what I can do to rig up some blocks. Today I started
disconnecting wires and hoses in preparation to pull out the engine. Nice to meet you as well Patrick, I will most likely be returning to pick a part sometime this week or weekend to get all the engine mounts out of a Pontiac trans sport. Does anyone know if the oil filter holder from a 1995 oldsmobile eighty eighty will work in a fiero? I will probably grab the one off the van anyway that puts the filter up over the axle. I plan on making a custom mount to put the alternator down where the A/C compressor used to be. But I'll have to wait to get it on the cradle to make sure there's enough clearance. |
Posted By: D_sensitized
Date Posted: 20 December 2009 at 11:16am
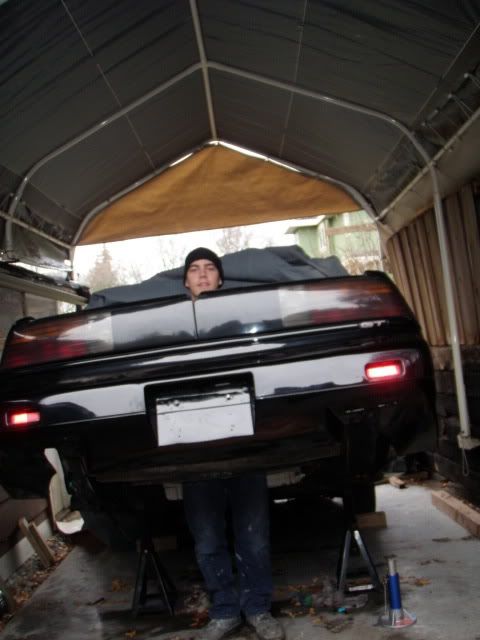 Success! 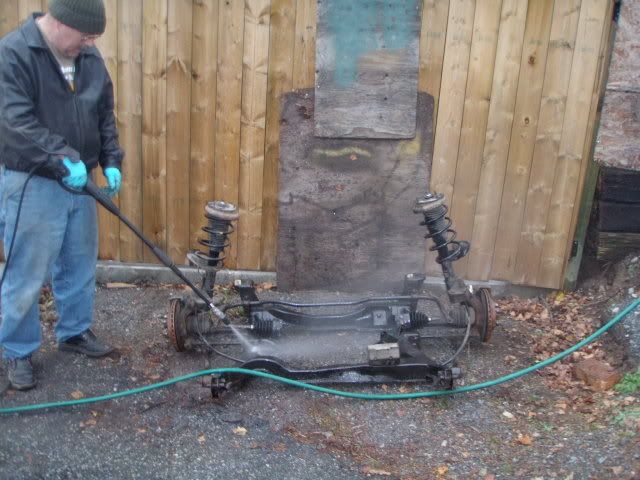 The trapped nut on the drivers side broke loose inside though, but still held in enough for me to get the cradle off but I will have to cut into there and fix that up. The cradle itself has a couple nicks and dings but is in good shape overall and pretty rust free. I started working on making templates for my alternator bracket and a tensioner pulley bracket. 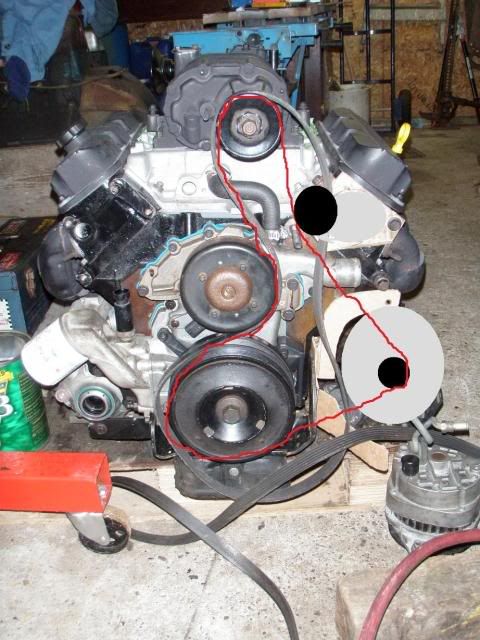 Thats my plan, the alt in the lower right and the tensioner up above. There is just enough room for about a 1/4" plate against the side of the head, I will probably have the hole threaded in the plate itself as well as a bit of a nut sticking up into the back of the tensionner housing. There is enough space to grind out for a nut just so there is more thread for the tensioner to hold onto. |
Posted By: Romeo
Date Posted: 21 December 2009 at 6:29am
You might need to take away some slack. Seems a bit wobbly.  ------------- Never shift into reverse without a back-up plan. |
Posted By: Patrick
Date Posted: 21 December 2009 at 11:00pm
|
I'd use something stronger than a red string as well.
|
Posted By: Romeo
Date Posted: 22 December 2009 at 7:25am
Yeah. I hear that can snap under load. Man, it's a good thing Patty and I are here to look out for you, that could've been disastrous...  ------------- Never shift into reverse without a back-up plan. |
Posted By: D_sensitized
Date Posted: 22 December 2009 at 12:21pm
|
Haha i guess I should make the alternator
mount out something other than cardboard too:p The other day I started working on the mounts. I got 2/3 mounts working and lined up but the front engine mount still needs some work. The mount I got off the minivan puts the rubber centered beneath the balancer but the mounting point on the cradle is offset 2 or 3 inches towards the front of the car. |
Posted By: D_sensitized
Date Posted: 23 December 2009 at 11:18pm
|
I went out to the garage today just to tinker and see if I could get something to work. I might try to trim a side of the front engine mount and move it as far over as possible and redrill all the mounting holes to make it work. I found that the front rubber from my '85 cradle is smaller and thinner so might give that one a shot as well but it doesn't look quite as beefy as the other one. the mounts that worked: the front transmission mount just dropped right in, no modification needed! I also have the same mount from the minivan that fits all the same holes but doesn't have that strut.  The fron trans mount needed a little trimming and for the whole to be lengthend but it all fits now. On this one I still used the stock fiero rubber with the donor cars bracket.  and this is the one that still needs work.  As you can see it needs to move over a couple inches, I know I could just buy the mounts and brackets but I would much rather make what I have work. The bottom left is the stock 88 fiero mount which is the exact same as on the donor car, the bottom right is form the '85 cradle- much thinner. The top mount is a broken one I found when I pulled the motor.  Also, isn't there supposed to be some sort of rubber or bushings here? the cradle was just bolted to the frame with nothing in between 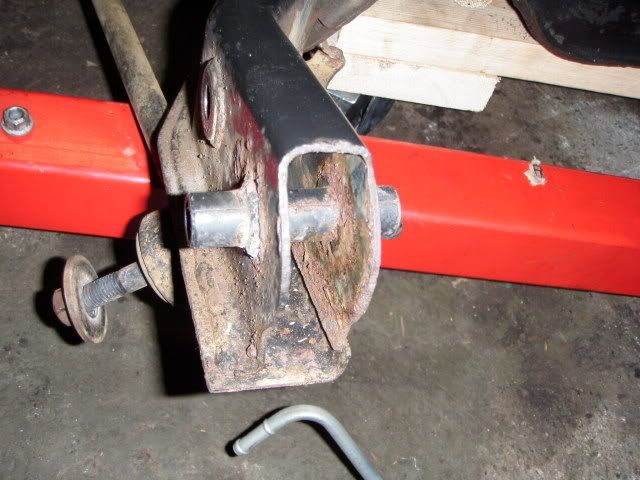 is that tube supposed to be welded in?  the '85 cradle has rubber in those same places.   |
Posted By: Dr.Fiero
Date Posted: 24 December 2009 at 5:12am
It's an '88 thing. They did away with the flex in the cradle there by solid mounting it. |
Posted By: D_sensitized
Date Posted: 30 December 2009 at 7:54pm
|
Thanks for the info. Success! I got the engine mounted to the cradle using the mounts I have. I just used the front mount from the 85, and redrilled the holes in the cradle and the bracket and it fits. i forgot to mention, the front trans mount(the one with the strut) did need one modification, it had a third stud out under the strut that i just chopped off. I will test fit it soon to make sure it all fits and to see that I have room for how I plan on doing the cooling hoses, alternator bracket etc. I would like to have the injectors cleaned before I put it all back together, does anyone know of a place that can clean them? |
Posted By: Patrick
Date Posted: 30 December 2009 at 9:51pm
|
http://www.witchhunter.com/ - WitchHunter Performance down in Washington State are highly regarded and charge $19 per injector.
|
Posted By: Romeo
Date Posted: 30 December 2009 at 10:44pm
|
Hey, that's $19 american, which if I'm not mistaken, is around the $376000 range in canadian dollars. Oh, economy burn. ------------- Never shift into reverse without a back-up plan. |
Posted By: D_sensitized
Date Posted: 30 December 2009 at 11:14pm
|
Thanks Patrick, Their site says they no longer ship to Canada though. I sent them an email asking if they would send it to a PO box in Blaine I may be able to use. We'll see how it goes. |
Posted By: Patrick
Date Posted: 30 December 2009 at 11:36pm
|
It's getting pretty close to par the last time I checked!
Damn, I was unaware of that. If you decide to use them, hopefully they'll let you use a P.O. box at the border/Blaine. As long as they've been paid, they shouldn't have a problem with that.
|
Posted By: D_sensitized
Date Posted: 05 January 2010 at 6:19pm
|
I sent them an email and the P.O. box in Lynden (not blaine) will work fine, I will just need to pay washington sales tax.I will send them out tonight. I was tinkering around looking through all the stuff that came with my engine, I will need to figure out just what parts of the wiring harness I actually need since I have just about every wire from the donor car minus what goes into the doors and under the seats. (I even have some turn signal bulbs and all the way to the plug for the rear taillights harness as well as under the dash behind the radio, HVAC etc.)  This shows some engine bay wiring beyond a firewall passthru. 3 plugs off this section plug into the transmission  more stuff:   I still don't completely understand just what I'm supposed to do for making a wiring harness. I know I just need the C500 and C203 connectors from the fiero but I don't really know what to do with the ECM wiring. I found this thread http://www.fiero.nl/forum/Archives/Archive-000001/HTML/20070 315-2-074653.html on PFF that seems to be usefull but i don't know if it's much different being obd2 and I have obd1. tips and advice appreciated. I went through the engine harness to track down all the plugs for sensors etc and have those all figured out but 1.  2 wires, black and green, down near the front of the engine( the one on the left with the wires exposed) 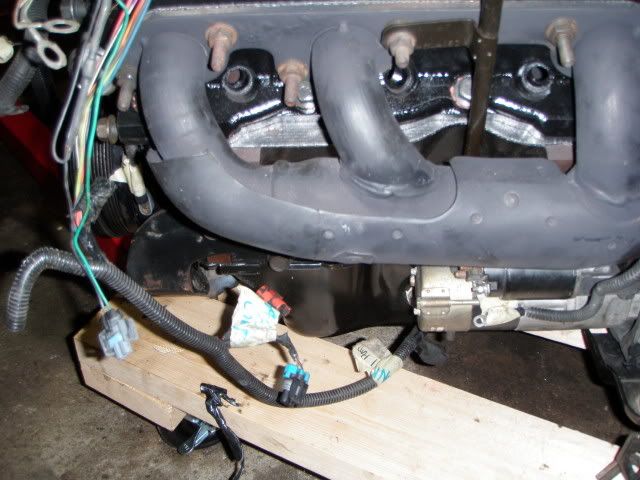 In the meantime I'll reread that PFF thread and look around for more info to help me. |
Posted By: Romeo
Date Posted: 06 January 2010 at 11:53pm
|
OBD II is much more integrated, typically speaking. As such, it tends to want more intel than an OBD I system. That may or may not be true in your case, but what is true is that the codes and software are globally applied to all cars running OBD II, rather than being brand specific, as was the case with OBD I. ------------- Never shift into reverse without a back-up plan. |
Posted By: D_sensitized
Date Posted: 09 January 2010 at 10:06pm
|
Got the engine bolted to the cradle today, and just put more off the bolt ons back on. Injectors have been cleaned and are on their way back. I was making a list of things that still need to be done/figured out. -Pulleys I got everything pretty much figured out, just need to get some steel plate for the tensioner bracket and when the alt is mounted I can find out what length belt I will need. I will leave some play before finalizing the alt bracket to put it in a good position for a common length belt. -Coolant lines For these is will be mostly stock, stock tstat, heater core running off the stock line in the intake manifold and putting a filler neck straight up off the now unneeded heater core return. -Wiring Still don't really know how I will be doing this, I got a bunch of wiring diagrams with the motor but they are for a oldsmobile 98 not an 88 so it won't be much good since things arent in the same spots. -Axles I have a few axle bits lying around so I will see what I can do with what I have and if not I will probably head over to pick a part to get anything needed. There are lot's of threads about them on PFF -Throttle/shifter cable I will need to get the engine in the car to see if the stock cables are long enough to go the routing I am thinking of so will wait on these. Hopefully the shifter bracket from the fiero trans will be short enough to fit next to the exhaust crossover. I will still need to dent into the heat shielding though. -Misc I can no longer mount the coil pack in the stock location since my belt tensionner is going there so i will mount it on the side of the other head, I can still use the stock bracket but might make a nicer one later down the line. I will need to get enough fuel/vacuum/coolant lines to make everything meet up. Get new rear cradle bolt for the one that stripped when it came out and cut into the frame so I can weld the trapped nut back in that broke loose when I took out the cradle. -Exhaust My plan is to have a small catalytic converter right off the manifold pointing down, then T off to 2 mufflers, one on each side and out the back. -Intake For now I will probably just route it to the stock airbox but will eventually make a better one when I get around to making sidescoops for the car. Lemme know if I'm overlooking anything. I will still need to buy stuff like all the fluids, spark plugs etc. |
Posted By: D_sensitized
Date Posted: 13 January 2010 at 9:55pm
|
Well I've started on the wiring. I got the old harness all taken apart and looped it all up ready to start making the harness. The only wires I've cut we're the ones that came together to one joint. (12v power stuff mostly) I just took all the connections out of the firewall connector and plan on reusing that same firewall plug to keep things clean. 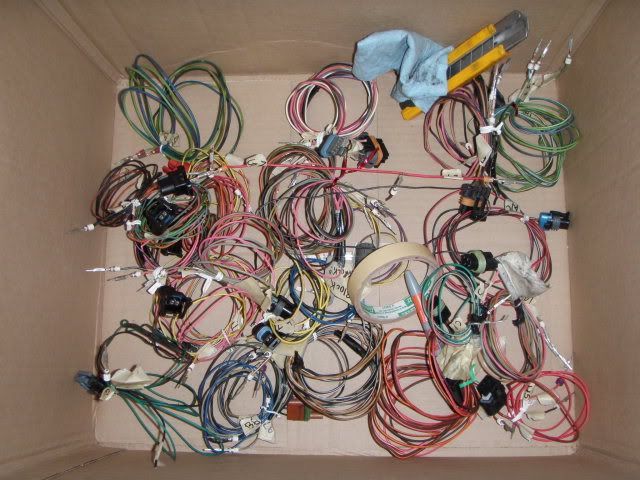 clean empty plug 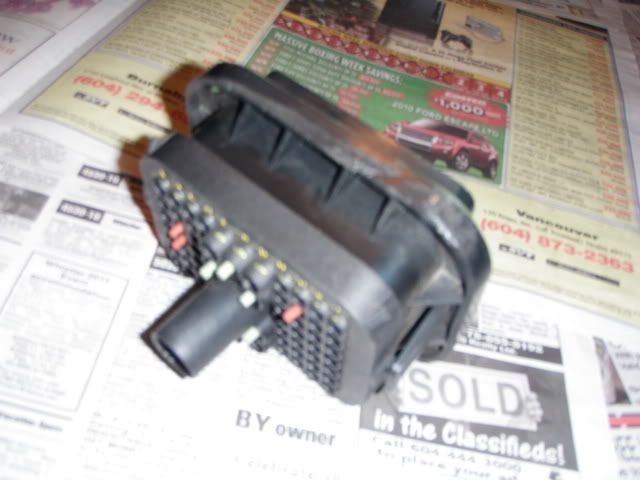 |
Posted By: D_sensitized
Date Posted: 19 January 2010 at 6:48pm
|
I got the injectors back from witchhunter performance. Actually they
got picked up from lynden last Tuesday so from the time I sent them out to when I got them back was no more then 8 days. And it looks like they did a good job. The injectors weren't too bad for the most part, before was about 3% variance and after was 1%. I got some shiney go fast red paint on and installed them. Sorry, I didn't have my camera when I installed them so I'll get some pics later. Looking at the back tranny mount, it's skewed towards the front of the engine a bit so I gotta pull it a off the cradle and widen the holes to move it over enough. I got the last gasket I needed from lordco today (throttle body) so I can get the whole engine together now minus belt. Tomorrow I'm hoping to get my alternator bracket bent up and installed and then start the wiring harness. I'll try to remember my camera this time :P |
Posted By: D_sensitized
Date Posted: 20 January 2010 at 11:50pm
Pictures!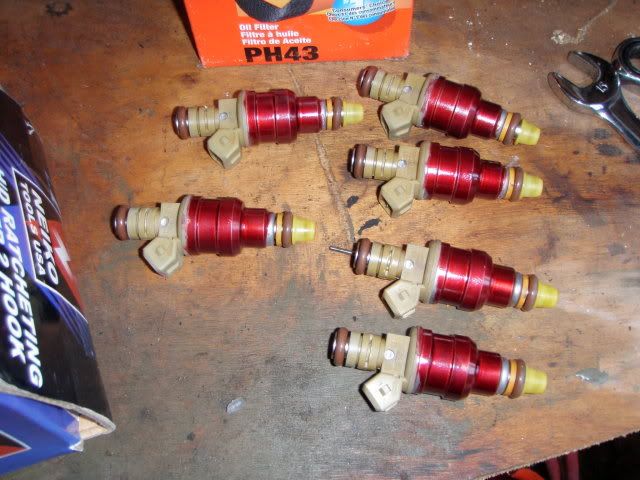 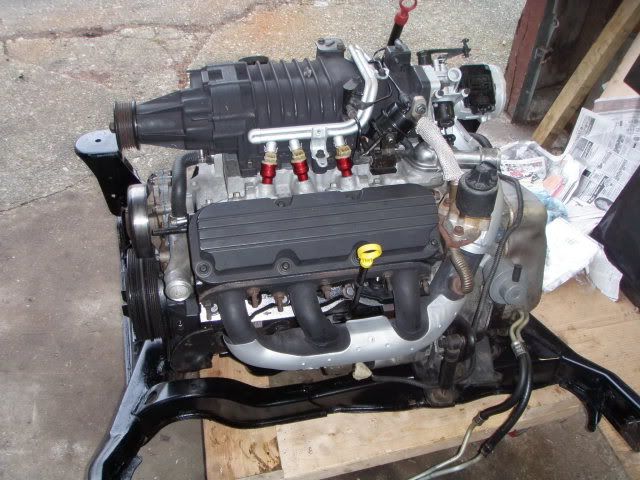 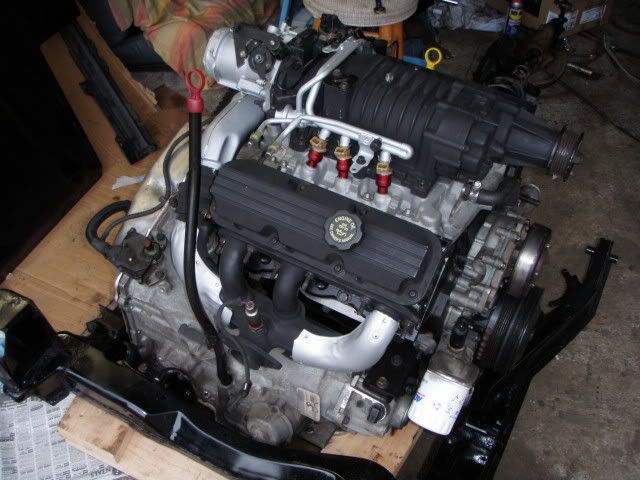 Alternator bracket being made. 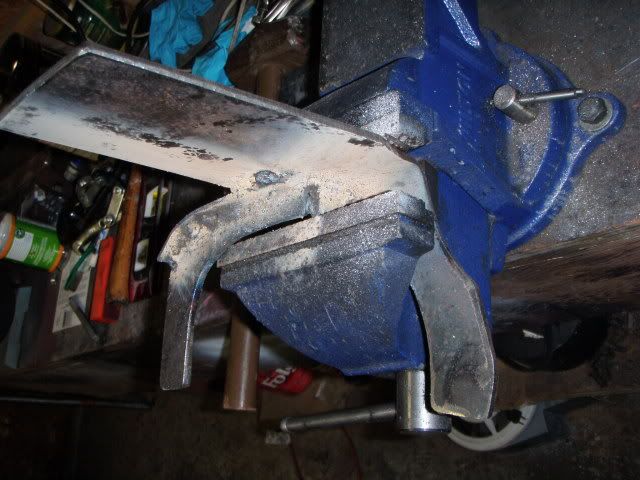 Bracket still needs modifications, some of the extra support we welded onto it is in the way of other things and all the holes drilled. |
Posted By: D_sensitized
Date Posted: 26 January 2010 at 7:27pm
|
update: been working on wiring mostly lately, alternator bracket still needs to be mounted but the holes are drilled to mount the alt to the bracket. I'm adding a firewall plug to the wiring which I know makes things more difficult for me since I pretty much have to make 2 harnesses (for each side of the firewall) but I like it better this way. I'm using the firewall plug from the donor car (pics earlier) but since none of the trans wiring went through I need some more connectors which I'll probably pick up tomorrow. Some wiring questions: Oil pressure sending unit- is it just wired the same as it was stock on the fiero? I'm going of the diagrams on the GMtuners website and it doesn't mention this. one of the wires off the TPS pin B I think. I got the other 2 wires done but I don't have anything that says where this one goes, is it needed? The sensor in the oilpan- again, I don't have anything that says what to do with it as I don't have the diagrams from the donor car. There's 2 plugs coming from the gear selector electronic dealie on the transmission around the shifter, I know what to do with the 4 wire plug, but nothing says anything about the other larger one, 6 or 7 pin i think, one is a larger gauge yellow wire. I will get some pics tomorrow or the day after of the connectors in question if no one knows which ones I'm talking about. The wiring diagram I'm going off: http://www.gmtuners.com/files/94-95_C-H-G-U_3800_PCM_Fiero.p df I know it says obd 1 for series 2 engines but if it's all the same electronics it shouldn't matter should it? |
Posted By: D_sensitized
Date Posted: 03 February 2010 at 11:25pm
|
Well I'm almost done all the engine bay wiring, minus one trans plug and the C500. I got the rest of it loomed a little bit for now and will permanently do it all nice when I know it all runs right. I got my alt bracket done and am just waiting for the paint to dry on that, it didn't work out the way I had originally planned it but i just spun the alt around to the other holes and after some spacers works perfectly. 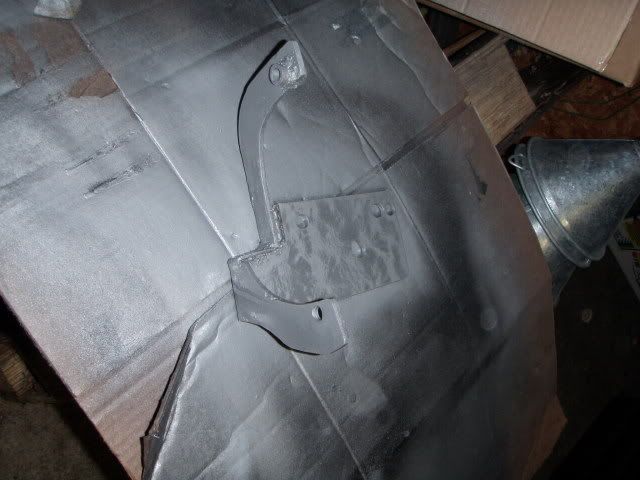 I put in my walbro fuel pump today finally and found out why my fuel gauge would never go below 1/3 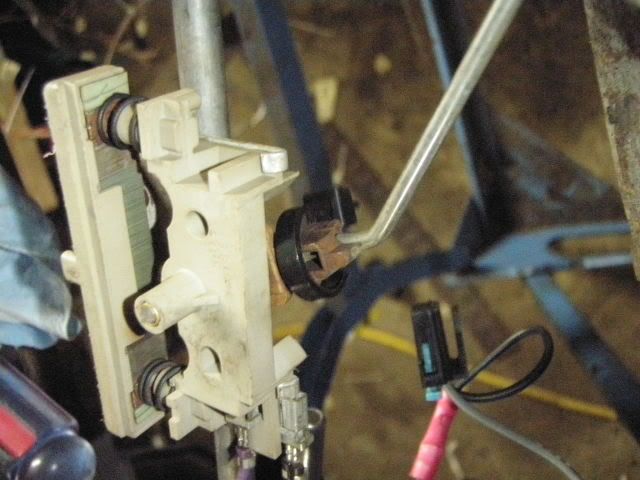 yes, that is a zip tie that gets in the way of letting the floater go all the way down. I also cleaned up the contacts so my fuel guage should be as accurate as ever when its done.   and here is the engine right now 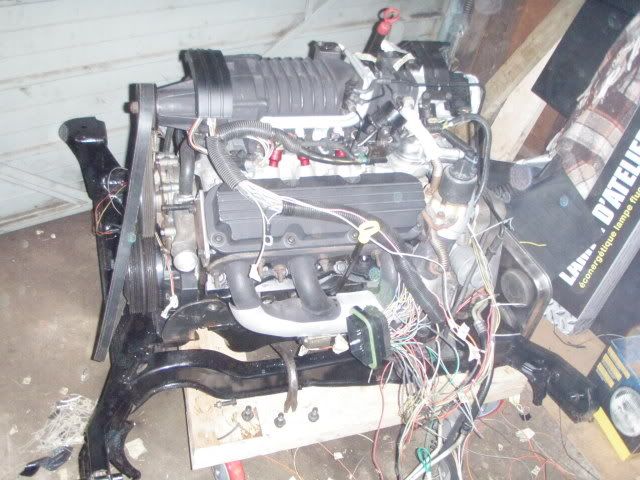 |
Posted By: Patrick
Date Posted: 04 February 2010 at 10:05am
|
Looks great so far!
|
Posted By: D_sensitized
Date Posted: 09 February 2010 at 5:25pm
|
I have been making some steady progress over the past few days, not much left to do and just small things before I get the engine back in the car. I finished my pulley system today though, tensionner isn't in the best of places or angle but works for now, I could try to figure out something else or see if there's a different design to fit better but this will have to do for now.  sorry for the crappy cellphone pic. But I do have some better pictures of the installed alternator and tensionner bracket. 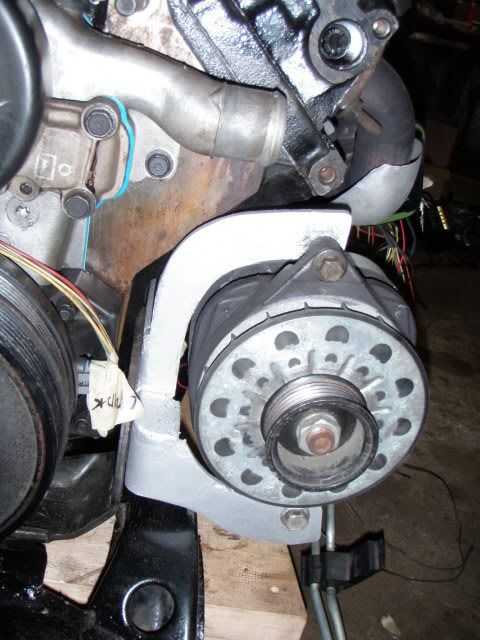 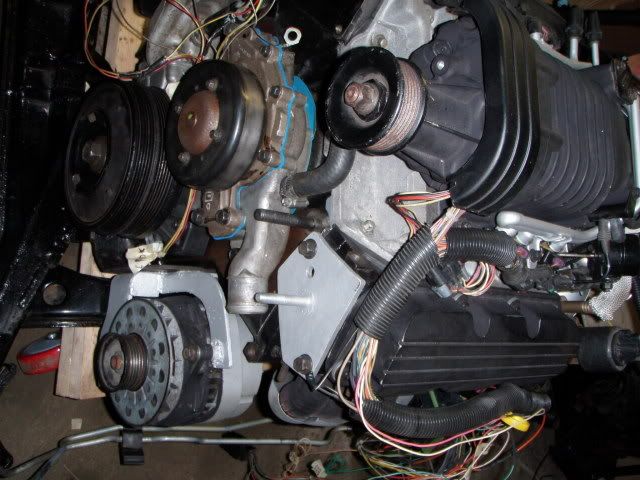 I rerouted the fuel lines in new steel tubing from the tank up to near where they will go into the fuel line along the opposite side of the engine as stock fiero. All I need to do now really is the plumbing for the heater core holes and put the gas tank back in and then I can get the engine in. I think I'm still doing pretty good for having it running by the summer(mostly due to me being unemployed right now but I do start night school tonight so eventually I'll be getting less and less time to work on it.) |
Posted By: D_sensitized
Date Posted: 09 February 2010 at 7:43pm
|
One more question, where do people put the ECMs on swaps. I've
seen in the trunk and engine bay but I am going to put mine in the cabin. It's about twice the size as the fiero unit so I was wondering how it gets mounted in the cab. I was thinking possibly behind a seat or just make a custom center console to fit it in either the stock location or lying flat. |
Posted By: Dr.Fiero
Date Posted: 09 February 2010 at 9:28pm
|
Don't stick it in the engine bay, unless it's one of the actual underhood ones that's all sealed up. I mounted a panel behind the passenger seat and used it to attach the ECM, relays, etc to in one swap. You can cover a chunk of thin plywood in carpet (etc), then it makes it easy to screw things down to, etc. If you want to, you can also bend up a plexi cover to go over it. Looks cool too. |
Posted By: D_sensitized
Date Posted: 17 February 2010 at 8:12pm
|
I will most likely put it against the firewall behind the passenger seat
or if it fits, on the floor. More progress has been made. I got the fuel tank back in the car and am done most of the fuel lines, just waiting for the engine to be in the car for the last bit so I know exactly where to end them. I got all new tubing and went around the drivers side of the engine bay. Today I started making the fittings for the heater core holes using bits of the old heater core lines. Being an 88 fiero I just need the one line from the engine to feed the heater core so I am using the other inlet to the engine as a fill point and am peicing together bits from the old heater core plumbing and the fiero tstat housing since it has a nice big cap for filling. That is the last thing I need to get done before the engine goes back into the car. So hopefully I can finish that up tomorrow and get the engine in sometime next week since I won't have time on the weekend. |
Posted By: D_sensitized
Date Posted: 23 February 2010 at 3:13pm
It's in!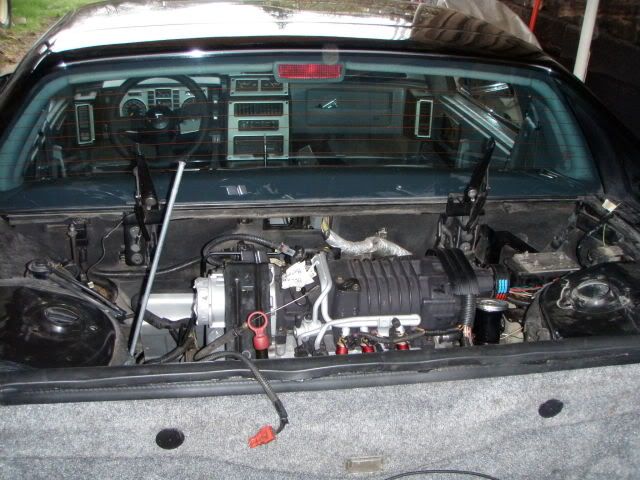 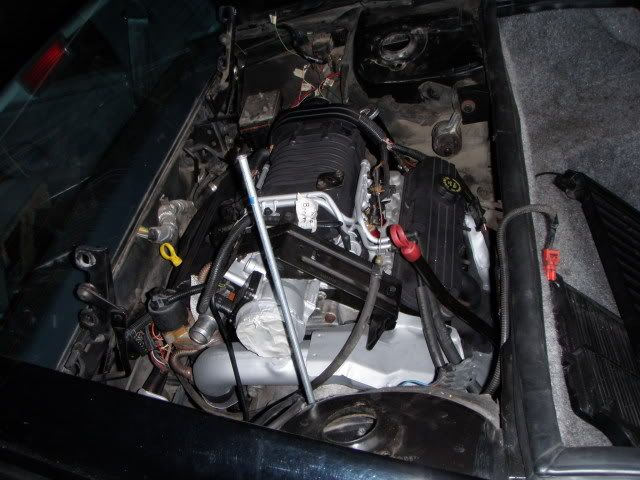 all ready to go in: 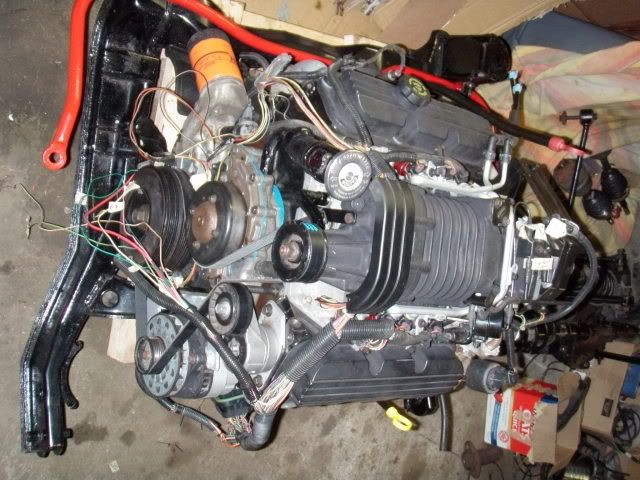 filter should be easy to get to: 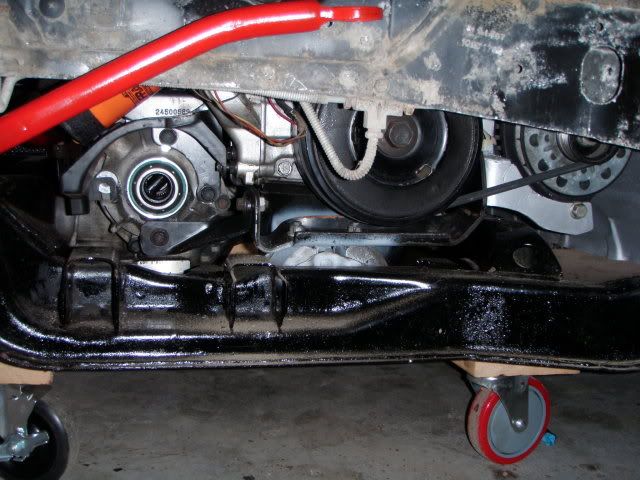 So now that it's in I can see what needs to be done to make all the hoses etc connect. I will need to make a throttle cable bracket, the stock 3800 puts the cable too far from the throttle. The shifter bracket I have in there looks like it will work (modified fiero one) When I was making the heater core hard line from the engine I forgot that the fiero hose was smaller so I will need to make an adapter for that. trans cooler lines- Which is Which?? I will cut a hole in the firewall for the passthrough connector. I will try to make a dogbone bracket that mounts it to the side of the head. Coilpack I think I will mount on the strut tower under the dogbone bracket. Fuel lines I will either try to get some rubber line with the threaded fitting already on one end or just cut the threaded part off the hard lines and just hose clamps with rubber hose. I think that's about it for now, I'll get to work on that later this week. |
Posted By: D_sensitized
Date Posted: 02 March 2010 at 2:27am
|
Well I've got most of the lines hooked up to the engine- heater core, passenger side radiator hose, trans cooler lines, fuel lines and most of the vacuum lines, just need some tubing for the brake booster line and some pipe for the drivers side rad hose. I havn't had time to work on the car for a few days now but will hopefully get back into things this week. |
Posted By: D_sensitized
Date Posted: 12 April 2010 at 8:01pm
|
So I havn't updated this thread in a while.
The car is back on it's own wheels now, suspension, axles, wheels all in place. Rolled it into the garage too so I can work on it indoors. I need to build or find a bracket to connect the shift cable to the knob onthe trans, a bracket to hold the throttle cable on the throttle and the wiring to the ecu. After that it should be drivable and just needs exhaust and intake. What have others used for that shifter bracket on 4t60e swaps? |
Posted By: D_sensitized
Date Posted: 28 June 2010 at 11:09pm
It's been a while since the last update, but I have been getting things done.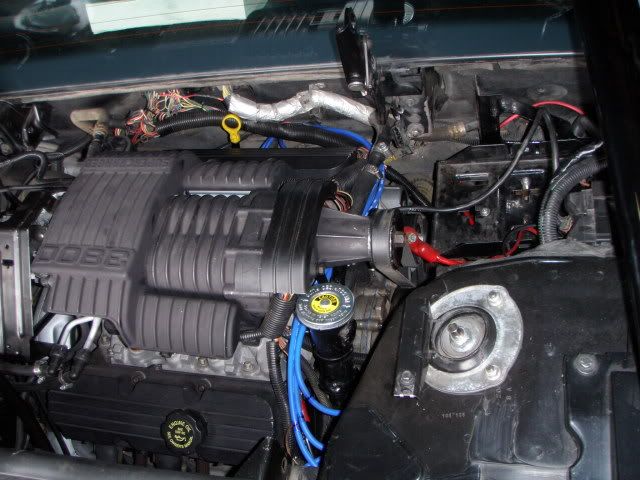 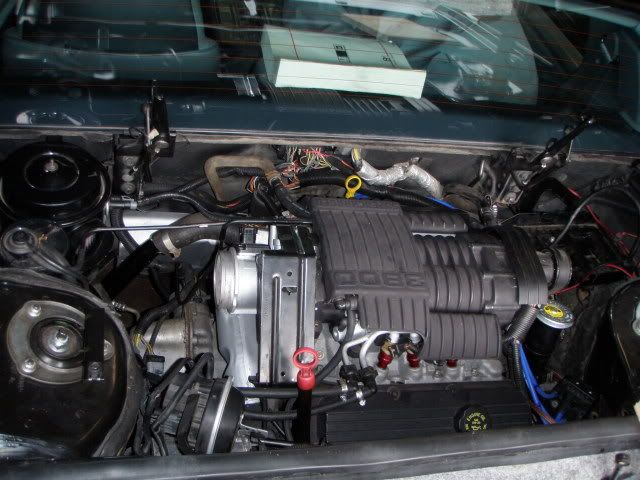 Got the shifter sorted out and working, filled the coolant system with no leaks! at least with no pressure. New spark plug wires, got the last of the engine/battery wiring installed, the interior harness to the PCM is done. I built a bracket to connect the throttle cable from the fiero to the one from the donor car so I could use the stock brackets. 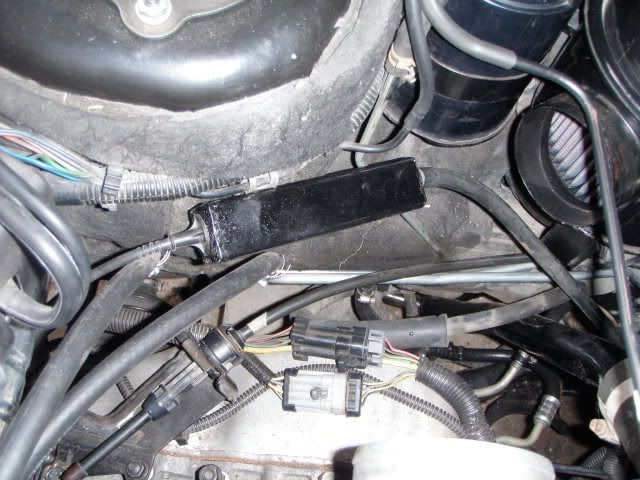 The 2 cables are crimped together inside the box. Another picture of what I did with the heater core outlet/inlet. 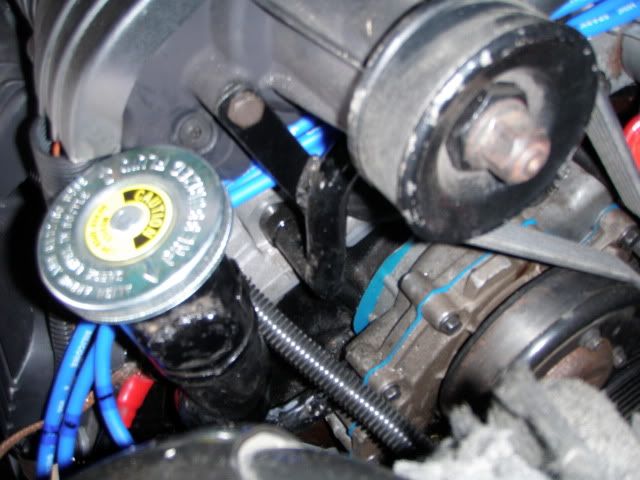 Here's the interior harness: 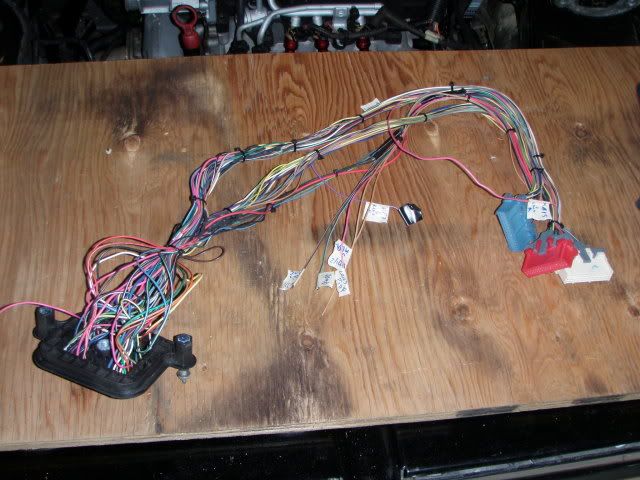 . .I sent the prom out to sinister performance to get programmed and should be getting that back hopefully tomorrow or wednesday, that's all that's needed to fire it up for the first time. (and putting in some fresh gas and the battery.) Still to do: wire in the speedometer, and ALDL port. put the interior back together and mount the ECM install intake ductwork- parts are on order, should arrive monday. Exhaust. I am going to enlarge up to 2.5 inch right after the manifold, into a catalytic converter then around into a muffler with an outlet at each end like the stock GT has and back to dual tips on each side. Does anyone know if they make a catalytic converter where the inlet and outlet are on the same side next to each other, so it is kind of like a Uturn inside? If all goes well I should have it running by the end of the week. :D |
Posted By: Patrick
Date Posted: 28 June 2010 at 11:30pm
|
Great! Shoot some video of it running, and of you doing a little victory dance!
|
Posted By: Capt Fiero
Date Posted: 29 June 2010 at 11:25pm
|
Always nice to see another modding car hitting the road ------------- Capt Fiero 88 Fiero GT 5spd V6 Eight Fifty Seven GT V8 5spd. |
Posted By: D_sensitized
Date Posted: 02 July 2010 at 12:38pm
|
Still waiting on the computer to come in the mail... I'm hoping to have it out by next weekend and actually making it to a meeting and joining the club, but it won't have much of an exhaust system by then. (probably just an old supertrapp temporarily welded to the flange if I can) I can get some little electronic bits from work to get the speedo to work properly. It's getting really close now:D |
Posted By: Patrick
Date Posted: 02 July 2010 at 12:46pm
|
Our next meeting is a week from tomorrow... Saturday, July 10th. We'll save a spot for you in the Ricky's parking lot!
|
Posted By: D_sensitized
Date Posted: 06 July 2010 at 9:53pm
|
It's alive!!!! Can't figure out how to embed youtube vids so a link will have to do. http://www.youtube.com/watch?v=srhRIbG92mk - http://www.youtube.com/watch?v=srhRIbG92mk started up perfectly first try :D The only issue I had was the fuel line. I just had a standard flared steel line going into the fuel filter and threaded in and as soon as i turned on the ignition to check the fuel pump for the first time, it all leaked out on the "out" end of the filter. I didn't check the fittings on the stock lines when I did the fuel lines way back when and the stock fittings were pretty much power steering lines with the oring and all. lordco has no steel stock with power steering fittings so I just have a piece of the old lines in there temporarily. Other than that, no issues, runs fine, no leaks, and sounds great. I will try to get the intake/exhaust/speedo hooked up this week and bring it to the meeting saturday. Otherwise I'll just have to take my eldorado. |
Posted By: Patrick
Date Posted: 06 July 2010 at 10:26pm
|
Heh heh, sounds like a tractor. I'm sure it'll really sound great when you get an exhaust system on there. Congratulations on getting it running!
|
Posted By: D_sensitized
Date Posted: 28 July 2010 at 10:27pm
|
I guess it's time I updated this again. It still has no exhaust on it yet but I have been working on other things here and there. I undeleted the P O N T I A C lettering on the rear since a previous owner removed the bulbs and sprayed the insides black. Here is a before and after, there was a whole lot of spray paint in there.  Some Hoppe's 9 blast and clean gun cleaner made short work of the paint though, but unfortunately it did put a few small cracks in the lense :( 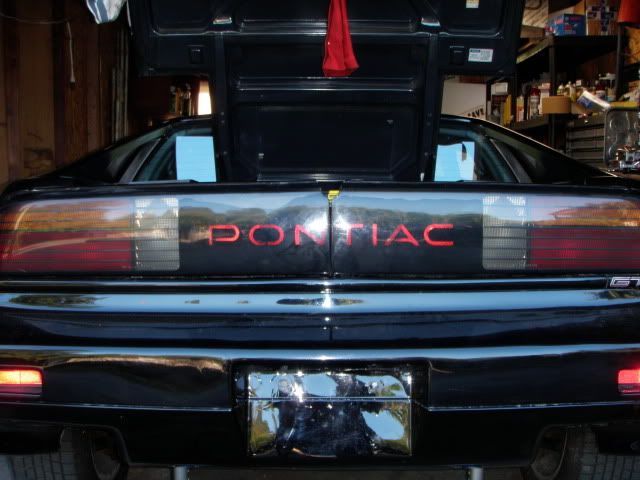 I also had to notch out a bit of the cradle because the transmission was resting on part of it and transferring vibrations throughout the car. 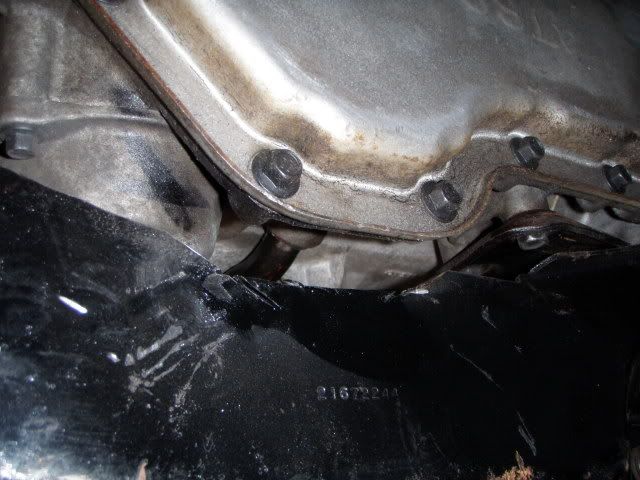 I got my catalytic converter and muffler finally and think I have a final design for my exhaust that flows well enough for my liking. But I did decide to cut my trunk. Speedo still isn't working and the oil pressure is really high on the gauge at 65 PSI checked with a mechanical gauge. I'm hoping to get the exhaust done by next week and any other issues that pop up are solved in time for the whistler run since I won't be able to make the august meeting. 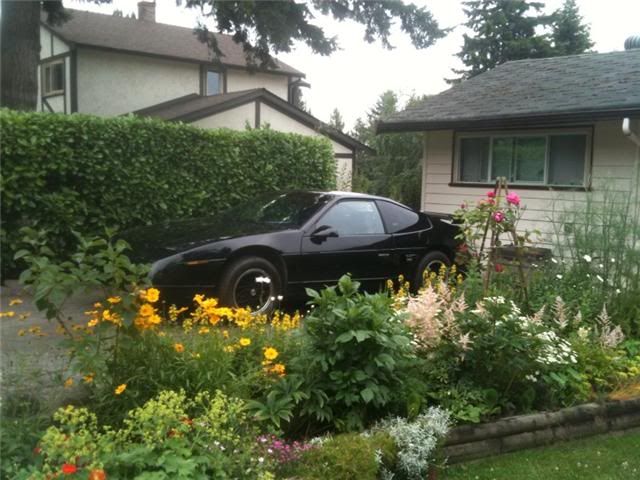 |
Posted By: Patrick
Date Posted: 29 July 2010 at 12:00am
|
That's a nice Fiero you've got growing in your garden there.
|
Posted By: Dawg
Date Posted: 29 July 2010 at 8:41am
|
I'd like to know what 3800 fertilizer he's using. DG ------------- You dream it up....I'll make it |
Posted By: Romeo
Date Posted: 29 July 2010 at 6:34pm
|
Scott's Turf Builder. Look for it in the SUPERCHARGED IS WIN section. ------------- Never shift into reverse without a back-up plan. |
Posted By: D_sensitized
Date Posted: 29 July 2010 at 10:46pm
|
haha, it only got to spend a couple days outside of the garage... But today I got the rest of the exhaust system tubing and welded it all up, if I have time tomorrow I will clean up the welds and find any holes I missed. 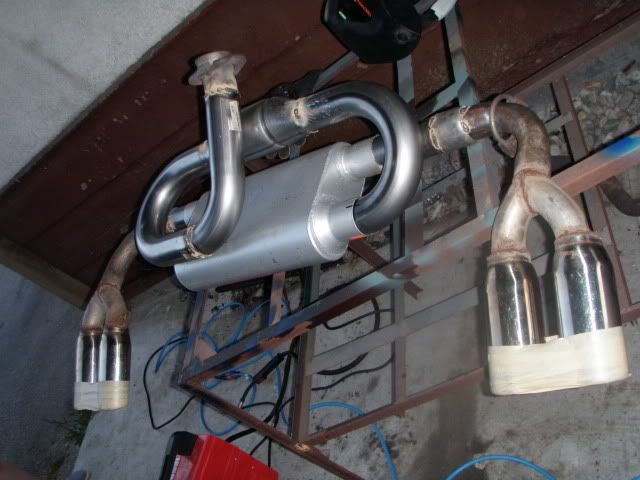 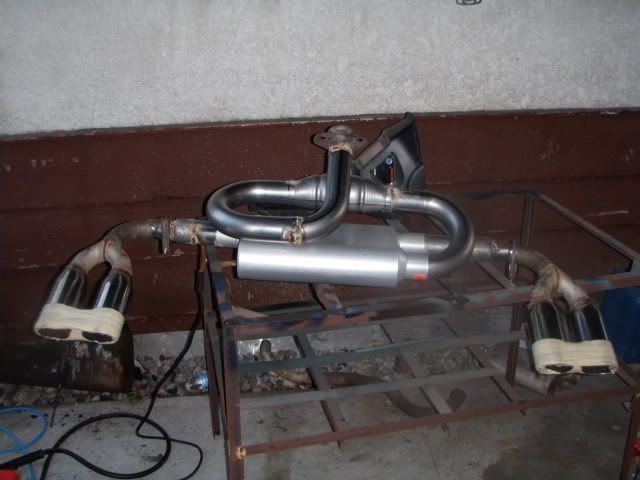 All sorts of stuff pop out of our garden:P  |
Posted By: Patrick
Date Posted: 29 July 2010 at 11:15pm
|
So, are you sharpening your skills on the Fiero so that you can use them on the tractor?
|
Posted By: D_sensitized
Date Posted: 04 August 2010 at 10:28pm
|
Well I got the exhaust installed and trunk all patched up and finished and that is all fine and dandy. But now I think theres something wrong in the transmission. I got a permit today and started driving around and it is really really sluggish when I start moving. The SES light came on I believe when it was shifting while going uphill. It seems like there is a lot of slippage in the transmission, it takes much longer to get going when its uphill. Any ideas? I will hopefully get to borrow a scantool tomorrow so I can run the codes and see what the computer has to say. I also couldnt get the speedo working so wonder if its possible the sensors not working, would that cause any isssues like this? Here's a video I took today with the exhaust installed http://www.youtube.com/watch?v=-685gWXNsb0 - http://www.youtube.com/watch?v=-685gWXNsb0 |
Posted By: Dr.Fiero
Date Posted: 05 August 2010 at 6:12am
|
Save me having to read numerous pages... what trans? |
Posted By: D_sensitized
Date Posted: 05 August 2010 at 6:54am
| 4t60e from the 1995 oldsmobile 88 obd1. |
Posted By: Dr.Fiero
Date Posted: 05 August 2010 at 8:17am
|
Yeah, GOTTA pull those codes! I have a chart if you can. If you have no VSS input to the ECM, it'll have no idea if you're moving (etc) so it'll definitely cause shifting issues. Luckily you only had a day permit, or I was going to say "Stop driving it!" before you really toast the thing. The wiring - is it 100% from the donor car, as is the ECM etc? 94/95 was a very strange time for GM, and a LOT of changes were going on. Fair warning - it's probably OBD1.5 (the connector could be a 12 or 16 pin connector - and MOST scan tools won't read it). |
Posted By: Patrick
Date Posted: 05 August 2010 at 9:23am
|
Or is that an old truck in the background (with probably its engine in the foreground)?
|
Posted By: D_sensitized
Date Posted: 07 August 2010 at 11:37pm
|
That's the "other truck" in the background. The engine is for yet another truck that might get restored eventually. It's all my dads WWII stuff, we take the good truck to quite a few events every year and sets up displays. Most of the time it lives at their museum on CFB chilliwak. I had the codes checked yesterday and it was in fact the VSS not feeding the PCM, causing it to go into limp mode and stay in second gear. I did reroute all the wires in the engine bay and to the computer and tested them all following the pin outs on the gmtuners site and everything checked out. Looking again at the VSS plug, I connected pin A and B where it said to put them but the colors were opposite. Today I switched them around but have yet to test them since I'm all out of tranny fluid after changing the filter. I also fixed the CV boot clamp that popped off and sprayed goo everywhere and installed the temp sensor from the 2.8 so I can have a working water temp gauge. Tomorrow I will test it again and see if swapping VSS wires fixes the issues or if the VSS itself is faulty in which case I will grab a spare or 2 from pick-a-part on our way out to chilliwak. And here is a quick phone video with exhaust installed, I have yet to make a better video that includes more than just idling  . .http://www.youtube.com/watch?v=-685gWXNsb0 - http://www.youtube.com/watch?v=-685gWXNsb0 |
Posted By: Dr.Fiero
Date Posted: 08 August 2010 at 8:53am
|
Just yank the VSS, and spin it up with a drill while watching the speedo and your scan tool (to make sure they're BOTH seeing it!). I hate CV grease. Bleah. That sh*t gets everywhere, and is like spray on glue! Oh yeah, and if you don't see a reading on the computer or speedo, hook your volt meter up (on AC) to the vss and spin it up again. At least then you'll know if it's the unit, or the wiring. |
Posted By: D_sensitized
Date Posted: 09 August 2010 at 8:12pm
|
There's nothing really to spin on the VSS, it's just s solid cylinder with a magnet. But I did hook it up to a voltmeter while pulling it close and far to something magnetic and was getting a reading with the original VSS. And I am stumped, replaced the VSS with one from pick-a-part, (I got a few spares as well) and no change, I hooked up a volt meter to the VSS wires at the ECM plug and spun the wheel by hand and it got a reading. I tried switching the wires since then and no change. When I had the scantool, we drove down the block and it was getting no signal at all from the VSS. I also opened up the ECM case and took out the circuit board and inspected it for any broken links and found nothing. I really don't know what else it could be, I emailed Ryan at GMtuners since he programmed my chip for his input but in the meantime, anyone got any more ideas? |
Posted By: Romeo
Date Posted: 09 August 2010 at 9:27pm
|
Grab an electrical diagram if you can, then that should help you pinpoint exactly where your fault lies. ------------- Never shift into reverse without a back-up plan. |
Posted By: D_sensitized
Date Posted: 09 August 2010 at 10:18pm
|
I have the diagrams for my engine but out of an olds ninety-eight instead of the 88 but it's all been the same so far except the purple and yellow wires are in the opposite spots in the VSS plug. I have traced the entire length of wires sensor to the ECM with no problems. The only thing I have left to try is one of the speed sensors i grabbed from the junkyard had the yellow and purple wires reversed in pins A and B. I don't expect that to change anything but I might as well give it a try. I am pretty sure my original VSS worked anyway and the problem lies elsewhere. If I were to connect the VSS directly to the speedo as it was stock, would the speedo do something? Just to make sure a proper signal is coming from the VSS down the wires. I know it wouldn't be accurate anyway because of the 4000/2000ppm thing but would it do something? |
Posted By: D_sensitized
Date Posted: 17 August 2010 at 9:19pm
|
So I have done everything else and decided there is something wrong with the ECM. So off to pick-a-part again this weekend and hope there is a superchaged series 1 car with the ECM still in there. I found a nice intake hose last time I was there off a '91 pontiac 6000 that is almost a perfect fit. One end just needed a little modifying to fit over the airbox outlet because it was too small but otherwise fits great. I have a picture on my camera but that is in langley at the moment so I will get that on later this week. I am currently working on a stronger alternator bracket since my current one has too much flex in it and make me worry about the lifespan of the alternator with all its wobbliness. Borrowing a cutting torch from work tomorrow so I can cut the steel plate I have for it. I have also been trying to figure out what I can to for a dog bone mount or equivalent.  This is what I had on one of the transmission mounts. I took it off today and it seems pretty worn. I plan on replacing it with a steel rod with an adjustable stop and see if that has much of an affect on engine movement. Here's a short video of the movement that happens just when shifting. http://www.youtube.com/watch?v=SdW_mbdkLI8 - http://www.youtube.com/watch?v=SdW_mbdkLI8 One of these days I will take a video with an actual camera and not just the iphone. Hopefully tomorrow I will get the alt bracket and mount modifications done. I was down in Washington all weekend but have Septembers meeting marked on the calender so I will be there hopefully with a driveable fiero this time. |
Posted By: Romeo
Date Posted: 17 August 2010 at 10:34pm
|
For the dog bone mount, is it at all possible to simply modify a Fiero dog bone into what you need? ------------- Never shift into reverse without a back-up plan. |
Posted By: D_sensitized
Date Posted: 18 August 2010 at 9:42pm
|
Well I could use the "U" piece that bolts to the dogbone, but I would have to fab up the rest of the bracket down the the cylinder head. That was my first plan, my dad suggested the torque rod down low. So if that doesn't work, I'll build a dogbone up top. Today I did get that torque bar done and installed, no pics and i will have to finish my alternator mount before I can test it again but it looks pretty good so far. It is still adjustable if I need to change it. |
Posted By: D_sensitized
Date Posted: 23 August 2010 at 10:14pm
|
I figured out my problem! The little metal sockets at the end of each wire inside the ECM plug were bent just a little bit wider. So when it was plugged into the ECM, it wasn't actually contacting the pin inside. bent it right and all was good, not a very easy thing to track down... Here is a picture of my beefed up Alternator bracket I finished this week. 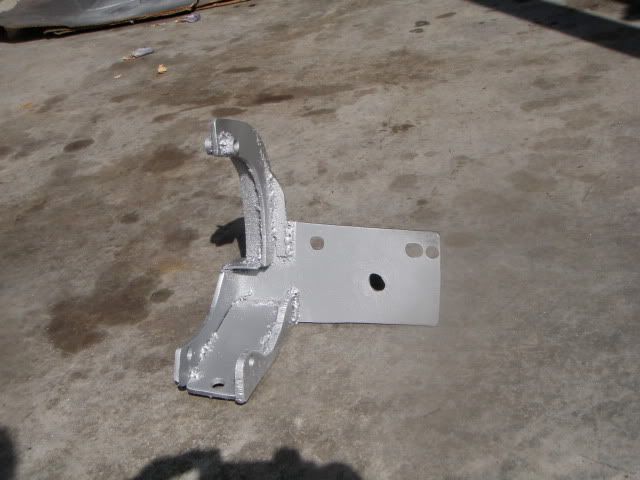 And here is the intake hose I am using from a '91 pontiac 6000 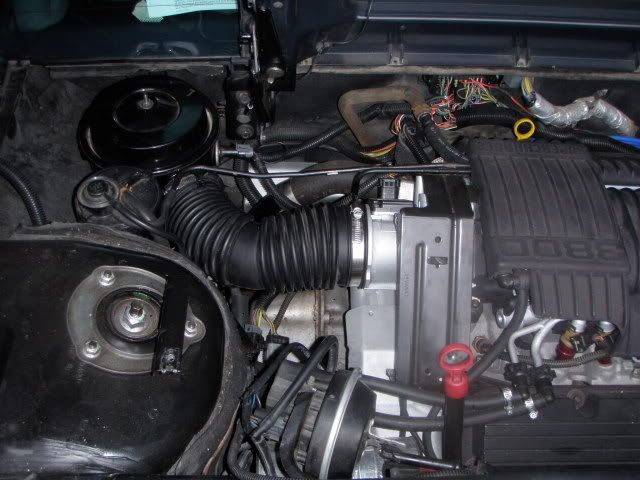 After some more test driving around another code popped up after about 20 minutes riding around. Don't remember the number but its the sensor circuit for the O2 sensor. Could be in the wiring, could be the sensor itself but I will check that tomorrow. I had a permit today and it ran fine so I was too busy playing with it to work on it.  There is a bit of a shutter in the right rear wheel area. I notice it more on tight left turns. The rotor also binds in the caliper in one spot on that wheel but I've ruled out the rotor itself so I may need to replace the hub. Could it also be the axle? While I still thought it was my ECM that was broken and then that it was something in my wiring that was breaking them I now have 2 spare ECMs- one with a N/A prom and one with the SC if anyone wants a series 1 ECM. |
Posted By: D_sensitized
Date Posted: 09 September 2010 at 9:39am
|
I got the fiero back together yesterday, I had the right rear axle out to replace a boot and seal on the trans. I also figured out why that wheel kept binding in the same spot. There wasn't enough clearance between the axle and that box thing where the control arm bolts into for the connector part of the CV boot clamp. So that would also explain the noise coming from there and why I kept tearing through clamps. The metal in the cradle was quite worn away in that one spot. I ground it down much further and shimmed up that side of the engine about 1/8" to give it enough clearance but if I ever replace the mounts I will move it a little further forward I think. Here is how much clearance I now have:  I also installed a small transmission cooler in front of the right rear wheel. Won't do a whole lot till I put a scoop on that side to get air moving but will be ok for now. 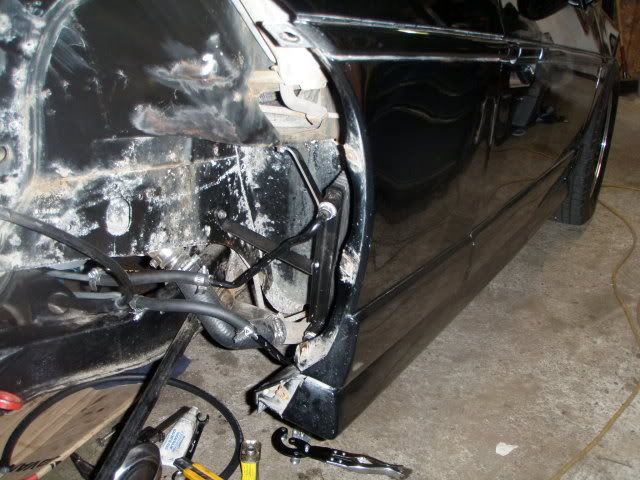   And here is that torque rod from earlier:  Still have to get the speedo hooked up and might have to replace the O2 sensor. Still need to do some testing on that. If all goes well I should be able to get it to the meeting this weekend. |
Posted By: D_sensitized
Date Posted: 23 September 2010 at 4:37pm
|
IT IS COMPLETE! I finally got around to properly hooking up the speedometer yesterday and after fixing a busted hinge on one of the ashtray covers, the swap is 100% done. There is always going to be other stuff to work on though of course, like filling the antena hole, adding a scoop for that hidden trans cooler but for now, everything is done. Once the weather clears up I will take lots of nice photos of the whole car and post them up. I might try to make it out this saturday to the autocross just to spectate and check things out a bit as well. |
Posted By: Patrick
Date Posted: 23 September 2010 at 5:17pm
|
Oh you silly silly fellow, you have so much to learn about Fiero ownership!
The first time I went out to the track (in August) I also went as a spectator, and I hated it. I hated it because after about two minutes I wanted to be out on the blacktop spinning my tires as well! However, I had a legitimate excuse not to be driving as I had Frankie (the hound) with me. Don't just come out to be a spectator. Drive your car! Honestly, it won't be hard on your car. You won't get out of second gear, you'll probably only be doing a maximum of 50 mph or so on the short straights, and you'll only be zipping around for a minute at a time. If we're all lucky we'll get perhaps eight trips each around the course. If you only come out to watch, you'll regret it!
|
Posted By: D_sensitized
Date Posted: 15 October 2010 at 9:20pm
|
Edit- pics dont seem to be working from my phone, will figure it out
and fix it when I get on a computer. So now that I have driven it around for a while, I have a good idea of my gas mileage, which isn't as good as I was hoping. I average 12-13 L/100km or about 18 mpg. Anyone have suggestions for how to improve that? My northstar eldorado gets the same mileage. Im pretty sure my front end is in fact higher then the rear. 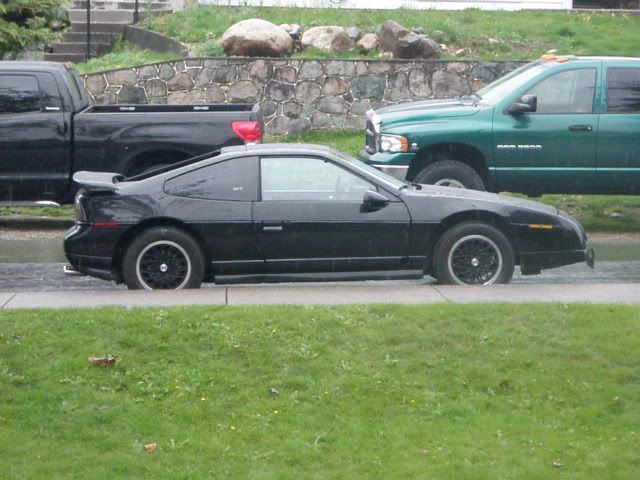 Compare the bottom of the car along the sidewalk and you'll see it. Had a chance to test the cars limits in the wet the other day, I don't really have much to compare it to since everything else I usually drive is either a whole lot bigger or just small 4 doors. But I like how it handles for the most part. But I will have to get good at trail braking to get a little more traction on the front wheels in the wet I think. I also got me another 88GT :P 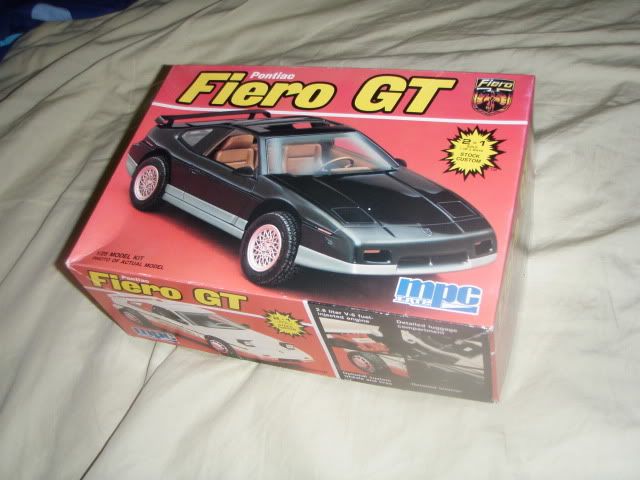  Should be a fun little side project for when I can't play with real cars. I will also get a for sale thread going when I get home and take some more pics of my leftovers. But the big things are 2 v6s that would need some rebuilding, auto trans, pre 88 cradle and isuzu. 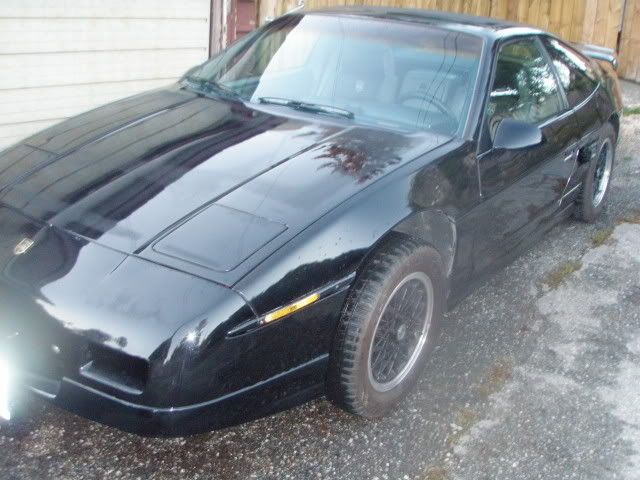 ------------- -Harrison 88GT 3800 SC1 F23 5-speed Chilliwack |
Posted By: D_sensitized
Date Posted: 22 October 2010 at 4:44pm
|
A quick video I just made of the exhaust like everyone else does :P http://www.youtube.com/watch?v=pf4UB5HoaG8 - http://www.youtube.com/watch?v=pf4UB5HoaG8 ------------- -Harrison 88GT 3800 SC1 F23 5-speed Chilliwack |
Posted By: D_sensitized
Date Posted: 17 June 2011 at 5:55pm
|
Finally got around to getting a dogbone bracket built and installed! Much less movement now, will eventually get a poly one since there is still movement that can be restrained.   ------------- -Harrison 88GT 3800 SC1 F23 5-speed Chilliwack |
Posted By: Romeo
Date Posted: 17 June 2011 at 6:18pm
|
Looking good. Did you make it yourself? ------------- Never shift into reverse without a back-up plan. |
Posted By: Dawg
Date Posted: 17 June 2011 at 8:10pm
|
I like it! The Dawg ------------- You dream it up....I'll make it |
Posted By: D_sensitized
Date Posted: 17 June 2011 at 11:54pm
|
Yup, made it myself, welded up some steel plate and happened to
have just the "U" bit for one end of a dogbone bracket from another car and welded it all up. 2 bolts to the head and one down to the block. ------------- -Harrison 88GT 3800 SC1 F23 5-speed Chilliwack |
Posted By: Romeo
Date Posted: 17 June 2011 at 11:58pm
Nice! Turned out real well.  ------------- Never shift into reverse without a back-up plan. |
Posted By: Blair
Date Posted: 18 June 2011 at 6:59am
| Looks good, do you notice a difference in the car and in what way? |
Posted By: D_sensitized
Date Posted: 19 June 2011 at 1:12pm
|
Huge difference, I used to feel the engine move when the trans shifted
gears, and things would shake like crazy on hard acceleration, now things are much more solid, still feel a bit of a thunk when going into/out of reverse but that's it. Should have done this a long time ago. I also checked up on my coolant hose brackets, since it was brought up a a recent meeting that they corrode pretty bad if left unchecked. Most were pretty good but the big one on the drivers side I could probably destrit with my bare hands. Took off all the rust, and repainted them so they're all good now. Before/after: ------------- -Harrison 88GT 3800 SC1 F23 5-speed Chilliwack |
Posted By: Guests
Date Posted: 21 June 2011 at 10:35pm
| Got a reply and Chris at WCF said they'll work fine. I'll order them pretty soon. |

 D_sensitized wrote:

