Build your own HUD for the Fiero, HELP
Printed From: West Coast Fieros
Category: Technical Topics Forum
Forum Name: Technical Questions and Discussions
Forum Description: Got a technical question about your fiero? ask it here.
URL: http://www.westcoastfieros.com/forum/forum_posts.asp?TID=1621
Printed Date: 24 April 2025 at 2:35am
Software Version: Web Wiz Forums 12.01 - http://www.webwizforums.com
Topic: Build your own HUD for the Fiero, HELP
Posted By: Capt Fiero
Subject: Build your own HUD for the Fiero, HELP
Date Posted: 29 November 2009 at 10:41pm
|
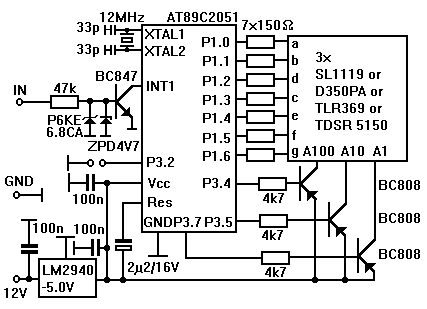
Ok this is what I want to build for the V8 as the stock Speedo that only goes to 180kph is just not going to cut it. Heck its almost useless in the 88GT. I am reading over this and frankly it is so far above my normal projects I am at a loss. Can anyone offer any info that a beginner might want to start this. That sparkfun place has that "free day" Yes free stuff and I want to take advantage of it to get most of my parts, however can't even tell if they have what I will need. The link to the spark fun special is here. http://www.sparkfun.com/commerce/news.php?id=305 - http://www.sparkfun.com/commerce/news.php?id=305 If anyone can offer assistance I would be greatly appreciated. Heads-Up Display Speedometer
The idea for this circuit originated on the Fiero mailing list. One listmember saw a HUD-Speedo on another car and asked me if it was possible to have something like this on the Fiero. Sure, it's possible. I came up with this little circuit that fits on a http://www.fieros.de/gif/hud2.gif - circuit board less than 2.5" x 2.5" and fits in a small box. I used Conrad Electronics P/N #522848 and it fits great. But any other box should do as well. The circuit consists of a small microcontroller and three 7-segment LEDs. The controller is responsible for measuring the speed and driving the LEDs. The reading on the display is mirrored, and the unit should be placed on the dash facing up. That way the reflection of the bright LEDs can be read on the windshield. A good place to mount the HUD is on top of the extra gauge cluster (at least on V6's). That way the reflection will appear right next to the rear view mirror. The image is not too bright at night, but bright enough during the day for most driving conditions. After all, this is not a HUD for a $30 million F16, but only for a $1-10K Fiero (although it is almost as much fun to drive and gets better mileage too!). BTW, a jumper is provided to select either mph or km/h, so people can use it whether they are in the US, Canada or Europe. The voltage regulator is National Semiconductor's LM2940-5.0V, which is designed for automotive use and can withstand over- and undervoltages of +/-60V. If you want a programmed CPU I will provide it at cost to whoever wants one, for noncommercial purposes only!
Installation is simple and only three wires need to be connected: Ground, Ignition and the Speedometer output. This is the output that feeds the ECM and Cruise Control (if equipped). Refer to the Helms manual for wiring details. If you want to make your own printed circuit board, you can find the layout for this and many other of my projects http://www.fieros.de/boards.html - here A word on cooling: in the worst case with all segments on on two digits and two segments on on one digit the circuit draws around 100mA current. At a battery voltage of 14 Volts the regulator converts 0.9W max. into heat. To prevent the regulator from dying of overheating (actually it shuts down, but you want the HUD to work under all conditions, right?), you can either Here is the parts list: AT89C2051 with program "HUD" ------------- Capt Fiero 88 Fiero GT 5spd V6 Eight Fifty Seven GT V8 5spd. |
Replies:
Posted By: Dawg
Date Posted: 30 November 2009 at 1:15am
|
There's a couple things I don't like about his circuit. One is the fact that he's using a programable chip. This means you're totally dependant on this guy to supply you with a chip. Two, he lists SMD components which are hard to work with. If you gather up the parts, I can certainly help you build it. Cheers DG ------------- You dream it up....I'll make it |
Posted By: Capt Fiero
Date Posted: 30 November 2009 at 3:33pm
|
Thanks for the offer and if I get all the parts together, I'll take you up on it. This would be a nice project for me to do come this winter when its too cold to be outside tinkering with the stuff. Anyone else notice that next week we are suppose to be drop to sub zero temps. ------------- Capt Fiero 88 Fiero GT 5spd V6 Eight Fifty Seven GT V8 5spd. |