MOTIVE Brake & Clutch Bleeding System |
Post Reply 
|
Page 123 4> |
| Author | ||
Bassman 
Senior Post God 
Sir Brian Joined: 12 February 2007 Location: Canada Status: Offline Points: 2501 |
 Post Options Post Options
 Quote Reply Quote Reply
 Topic: MOTIVE Brake & Clutch Bleeding System Topic: MOTIVE Brake & Clutch Bleeding SystemPosted: 11 August 2010 at 9:14am |
|
|
Well, I gave in and ordered one http://store.motiveproducts.com/american-bleeder-kit--0252-p 15.aspx |
||
|
Brian (Bassman)
86 GT Fastback 3.2L 2013 Mazda3 Sport GS SkyActive [IMG]http://i170.photobucket.com/albums/u243/Bassman68/BassmanSignature.png"> |
||
 |
||
|
Patrick
Newbie 
Joined: 19 April 2008 Location: Vancouver Status: Offline Points: 6 |
Post Options
Quote Reply
Posted: 11 August 2010 at 9:18am |
|
|
Sweet! Now we just need to source a bulk container of that neat blue stuff.
|
||
|
||
|
Romeo
Senior Post God

Joined: 16 November 2008 Location: Canada Status: Offline Points: 3033 |
Post Options
Quote Reply
Posted: 12 August 2010 at 7:28am |
|
|
Time to steal brake fluid from work... Kidding! I wouldn't mind doing a flush some day. As anyone who's seen Gretchin's front end can attest, well... The fluids are black.

|
||
|
Never shift into reverse without a back-up plan.
|
||
|
||
|
Bassman
Senior Post God
Sir Brian Joined: 12 February 2007 Location: Canada Status: Offline Points: 2501 |
Post Options
Quote Reply
Posted: 12 August 2010 at 6:20pm |
|
|
Or see if you can get cost, I would want the Motul, that's my next upgrade. I will say, after today being my second track event since my rebuild and Superblue fluid...my brakes felt great, stinky but great
|
||
|
Brian (Bassman)
86 GT Fastback 3.2L 2013 Mazda3 Sport GS SkyActive [IMG]http://i170.photobucket.com/albums/u243/Bassman68/BassmanSignature.png"> |
||
|
||
|
Romeo
Senior Post God
Joined: 16 November 2008 Location: Canada Status: Offline Points: 3033 |
Post Options
Quote Reply
Posted: 12 August 2010 at 6:49pm |
|
|
I don't suppose any makes seals for the Fiero capable of handling silicon, do they? DOT V isn't outrageously expensive (Although it would require replacing ALL the brake fluid, as it doesn't play well with 3/4/5.1) and is tied for highest boiling point (With 5.1, which is outrageously expensive) of all fluids. Seeing as how none of our cars have ABS, our only concern would be the silicon eating seals.
|
||
|
Never shift into reverse without a back-up plan.
|
||
|
||
|
Bassman
Senior Post God
Sir Brian Joined: 12 February 2007 Location: Canada Status: Offline Points: 2501 |
Post Options
Quote Reply
Posted: 12 August 2010 at 6:58pm |
|
|
Note sure what your reading, but did you not catch Austin's findings about Dot 5 breaking down in heat faster...I want to flush and get rid of it in my clutch line
 , brakes with Motul:) , brakes with Motul:)
|
||
|
Brian (Bassman)
86 GT Fastback 3.2L 2013 Mazda3 Sport GS SkyActive [IMG]http://i170.photobucket.com/albums/u243/Bassman68/BassmanSignature.png"> |
||
|
||
|
Romeo
Senior Post God
Joined: 16 November 2008 Location: Canada Status: Offline Points: 3033 |
Post Options
Quote Reply
Posted: 12 August 2010 at 10:24pm |
|
|
No, I hadn't heard about that, but given that it's dry (Not infected with water vapour) is almost a full hundred-fifty degrees higher than DOT3, and around eighty more than DOT4, now you've piqued my curiousity. Wouldn't mind reading that myself, if you still happen to have a link, per chance.
|
||
|
Never shift into reverse without a back-up plan.
|
||
|
||
|
Bassman
Senior Post God
Sir Brian Joined: 12 February 2007 Location: Canada Status: Offline Points: 2501 |
Post Options
Quote Reply
Posted: 13 August 2010 at 8:36am |
|
|
Read up here...the main issue is compatrability, and would you EVER hit those temps to require Dot 5...from my experience, no. |
||
|
Brian (Bassman)
86 GT Fastback 3.2L 2013 Mazda3 Sport GS SkyActive [IMG]http://i170.photobucket.com/albums/u243/Bassman68/BassmanSignature.png"> |
||
|
||
|
Patrick
Newbie
Joined: 19 April 2008 Location: Vancouver Status: Offline Points: 6 |
Post Options
Quote Reply
Posted: 03 September 2010 at 3:42pm |
|
|
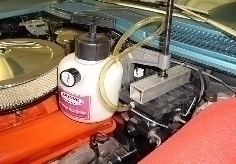
Brian kindly dropped off his brand new brake bleeder at my place yesterday so that I could pressure bleed my brake and hydraulic systems before the autocross on Sunday. To make a long story short, I can't get it to work properly. There's a supplied plate/seal that sits on the top of the brake fluid reservoir that's supposed to be held down air tight by four wing nuts/bolts and two chains that wrap around the bottom of the master brake cylinder.
I've cranked them all down pretty good and as soon as I build up any pressure (3-4 lbs) with the supplied pump, it hisses in one place or another somewhere around the "seal". To use this bleeder, it's supposed to be pressurized up to around 12 lbs. I'm hesitant to really crank down on the wing nuts as I don't wish to collapse my plastic reservoir! I even tried to use a modified factory rubber seal along with this plate while it was on the reservoir, but the rubber seal won't sit properly unless the factory "cap" is also used. (The factory cap sort of sits in the seal and pushes it out towards the edge.) Any advice from anyone who may have used one of these devices?
|
||
|
||
|
Dawg
Senior Member 

Joined: 15 August 2009 Location: Canada Status: Offline Points: 988 |
Post Options
Quote Reply
Posted: 03 September 2010 at 4:38pm |
|
|
I've noticed with mine that you need to try and center the "cap" on the plastic reservoir or it tends to rock slightly.
My bleeder is a huge industrial one but it's rather old and the rubber is less soft then it was years ago. So I have to be extra precise. Try that and try to gauge the amount of pressure applied between each chain tightener. Make them even. Also, you can do a good bleed with very little pressure. It just takes more time. So push the pressure as high as you can and see if the fluid comes out at the other end. This BTW is one of the BEST things you can do to your brakes. That being flushing everything out every year or so. DG |
||
|
You dream it up....I'll make it
|
||
|
||
|
Bassman
Senior Post God
Sir Brian Joined: 12 February 2007 Location: Canada Status: Offline Points: 2501 |
Post Options
Quote Reply
Posted: 03 September 2010 at 4:48pm |
|
|
Hmm, hope it works out...otherwise back it goes, but everyone knows
how hard that is with US orders. |
||
|
Brian (Bassman)
86 GT Fastback 3.2L 2013 Mazda3 Sport GS SkyActive [IMG]http://i170.photobucket.com/albums/u243/Bassman68/BassmanSignature.png"> |
||
|
||
|
Patrick
Newbie
Joined: 19 April 2008 Location: Vancouver Status: Offline Points: 6 |
Post Options
Quote Reply
Posted: 03 September 2010 at 5:00pm |
|
|
Good advice Damien, but this particular supplied plate is just barely large enough to cover our Fiero brake fluid reservoirs. There is no room for side to side movement at all, and only about a quarter inch front to back.
That's the key right there. It's difficult to explain, but the bolt/wing nut chain assemblies are rather poorly designed. When tightened up the bolts end up being on weird angles and sort of get jammed in the slots in the plastic lid/plate that's supposed to be tightened down. This no doubt results in uneven torque being applied to the four "corners", and this then results in a poor seal. With that in mind, I might see if I can put something under the master cylinder (as wide as the plate) so that the chains would be coming straight up after wrapping under it. Like this... U ...more so than this... V ...if that makes any sense!
|
||
|
||
|
Patrick
Newbie
Joined: 19 April 2008 Location: Vancouver Status: Offline Points: 6 |
Post Options
Quote Reply
Posted: 03 September 2010 at 6:23pm |
|
|
I cut out a piece of plywood basically the same size as the top of the reservoir to go under the master cylinder. This allows the chains/bolts to be sitting straight up and down. I've got the wing nuts cranked pretty tight, but the fricken thing will still only hold 4 lbs of pressure before it hisses and leaks. I'm starting to lose my patience as I've been baking in the open sun for hours fiddling with this thing. I just don't think the rubber pad on the underside of the plate is soft/pliable enough to fit snugly/tightly enough on the top of the Fiero's plastic reservoir. I don't want to try tightening these wing nuts anymore. Something is bound to break if I do. I'll try bleeding with 4 lbs of pressure. It'll be better than gravity bleeding, but not by much.
|
||
|
||
|
Dr.Fiero
Senior Post God
Joined: 12 February 2007 Location: Canada Status: Offline Points: 1726 |
Post Options
Quote Reply
Posted: 03 September 2010 at 6:51pm |
|
|
There's one of those damn caps included in MY brake bleeder as well. I've never, ever gotten it to seal once in all these years (why I keep even trying is beyond me!).
I'm pretty sure they were for use on the old style oval master cylinder that was all cast (one piece). You'd be able to crank THAT sum'bitch down so tight it'd never leak. Maybe if you could get a sheet of flat rubber that's the same as an inner tube, and make a 'patch' over the whole existing rubber do-da. Pond liner for example. Comes in rolls, and it's totally flat. I've got some here actually - was going to use it on the CNC machine. |
||
|
||
|
Dawg
Senior Member
Joined: 15 August 2009 Location: Canada Status: Offline Points: 988 |
Post Options
Quote Reply
Posted: 03 September 2010 at 9:56pm |
|
|
My bleeder has a good setup. The "chain" goes from one end of a spreader bar, down under and to the other end of said bar. The middle of the bar has a threaded rod that bears down in the middle of the cap. So the pull is always straight up. Works great as long as it's centered.
Brian, you might need to rig up thumb screws on both sides instead of one. If the cap is leaking on one side, you simply loosen the screws on the good side just a bit and tighten the one on the leaky side a little more. Eventually, it would seal perfectly. I bet it would be easy to rig up too. DG |
||
|
You dream it up....I'll make it
|
||
|
||
|
Patrick
Newbie
Joined: 19 April 2008 Location: Vancouver Status: Offline Points: 6 |
Post Options
Quote Reply
Posted: 03 September 2010 at 10:17pm |
|
|
Bingo, that's no doubt what it was designed for. Cranking that sucker down on a cast iron reservoir would probably be fine. On a plastic reservoir, not a chance.
If you look at that image I posted earlier you'll see that there are four wing nuts/bolts - two on each side. It's no good. It leaks on the ends. Brian came over so he could see what I was dealing with. There's no way that plate (as supplied) is ever going to seal properly on a plastic reservoir. John's idea of using another piece of softer rubber is actually something that Brian and I were discussing as an option while he was here. However, it would be best to simply have a plate supplied that seals and works as advertised.
|
||
|
||
|
Bassman
Senior Post God
Sir Brian Joined: 12 February 2007 Location: Canada Status: Offline Points: 2501 |
Post Options
Quote Reply
Posted: 03 September 2010 at 10:41pm |
|
|
Very impressed, I actually had a reply from my contact at Motive via iPhone when I got home...I sent him the content of this thread to read and see if we can come up with a solution...very impressed and hope this can be resolved...the clutch round adapter concerns me now also.
|
||
|
Brian (Bassman)
86 GT Fastback 3.2L 2013 Mazda3 Sport GS SkyActive [IMG]http://i170.photobucket.com/albums/u243/Bassman68/BassmanSignature.png"> |
||
|
||
|
Bassman
Senior Post God
Sir Brian Joined: 12 February 2007 Location: Canada Status: Offline Points: 2501 |
Post Options
Quote Reply
Posted: 03 September 2010 at 10:55pm |
|
|
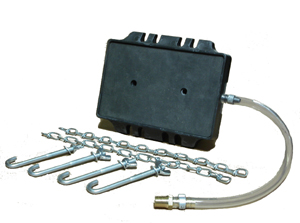
Look what I found on the site:
|
||
|
Brian (Bassman)
86 GT Fastback 3.2L 2013 Mazda3 Sport GS SkyActive [IMG]http://i170.photobucket.com/albums/u243/Bassman68/BassmanSignature.png"> |
||
|
||
|
Patrick
Newbie
Joined: 19 April 2008 Location: Vancouver Status: Offline Points: 6 |
Post Options
Quote Reply
Posted: 03 September 2010 at 11:21pm |
|
Brian, it's difficult to see it in that picture, but I suspect that's the old style one piece cast iron reservoir/master cylinder. Sure, clamping down on that would work fine, but we'd probably still have the same problem with our plastic reservoirs. By the time we cranked that C-clamp tight enough to seal that hard rubber pad on the plate against our reservoirs, I'm pretty sure we would have cracked or flattened the plastic reservoir. I'm more convinced than ever that the main problem is with the hard rubber pad. It's just not pliable enough to effectively seal (without a whole lot of force) against a relatively fragile plastic reservoir. I'm glad to hear that your contact at Motive appears to be interested in helping to resolve this issue.
|
||
|
||
|
Bassman
Senior Post God
Sir Brian Joined: 12 February 2007 Location: Canada Status: Offline Points: 2501 |
Post Options
Quote Reply
Posted: 04 September 2010 at 9:34am |
|
|
Very impressed again to receive a reply this morning...seems I need to arrange with Motive the correct adapters, here's the email content, and off to David's (see you shortly): Hi Marco, Yes the Fiero has a plastic reservoir, I triple checked based on your application guide to ensure I ordered the right parts/kit, it says bleeder 0105 and adapter 1105, hence why I bought American Bleeder Kit 0252 for our car club so all can use. I also hoped that this kit would have been good for also my 1997 Pontiac Grand AM, so the universal round does not look like it will work on either car, GA seems to need a 1108, uncertain is 1101 will fit the clutch on the Fiero, but at this stage I do not want to open the bag it came in until we confirm details. I don�t believe I should have to pay the upgrade for the 1115, I may not have read the fine print as I should be able to trust your application guide...maybe update this thenJ. For my purpose Marco, I will take your suggestion on what we should do here especially if we have to ship and exchange items, I certainly has no issues in paying for correct products...please advise. I do thank you for your prompt replies also...Cheers, Brian PS: The whole shipping issues, customs changed the tracking code which neither of us had, so I had to provide a idea of what the box would look like, and the �e� for my last name was missed, so this was not matching up From: motivesupport@gmail.com [mailto:motivesupport@gmail.com] On Behalf Of Motive Products Support Brian, please see the note here at the bottom of the descriptions. http://store.motiveproducts.com/rectangular-universal-adapte r--1105-p58.aspx http://store.motiveproducts.com/early-american-rectangular-b leeder--0105-p32.aspx The Fiero has a plastic reservoir, correct? No fix necessary to the 1105 - it's nearly impossible to get it to seal on a plastic reservoir- you just need to buy the correct part. The issue with the plastic reservoir is reason we made the 1115. We offer a $15 upgrade to the 1115 for those that have the 1105. Marco
|
||
|
Brian (Bassman)
86 GT Fastback 3.2L 2013 Mazda3 Sport GS SkyActive [IMG]http://i170.photobucket.com/albums/u243/Bassman68/BassmanSignature.png"> |
||
|
||
|
Post Reply
|
Page 123 4> |
 Tweet
Tweet
|
| Forum Jump | Forum Permissions You cannot post new topics in this forum You cannot reply to topics in this forum You cannot delete your posts in this forum You cannot edit your posts in this forum You cannot create polls in this forum You cannot vote in polls in this forum |


 Topic Options
 ...so if anyone in the club has a need for a brake and/or clutch bleeding unit, let me know...I picked up this one with the catch bottle, we can do a tech day:)...and since my Fiero is done except the clutch with the ATE Super Blue Dot 4, we can do my GA GT and get rid of the stock Dot 3 whioch I cannot remember when or if it has been changed
 ...Cheers

 Dawg wrote: